Classic R #27 Build - Fuel System
Page 1 of 1

Classic R #27 Build - Fuel System
![]() by comled Wed Aug 10, 2016 9:11 am
by comled Wed Aug 10, 2016 9:11 am
I have been working on the fuel system implementation for several months now, trying to get an installation that I felt comfortable with in terms of the fuel pump and filter locations. In the stock fuel system design, there's a pre-pump filter that feeds the Walbro GSL392 pump. The pump directly feeds the regulator and the regulator then connects to the fuel injection hardline in the engine bay via a long run of stainless braided hose routed along the transmission tunnel.
I'm using the Stalker Cars aluminum fuel tank which has a sump and a -8 takeoffpoint more or less in the center of the car on the rear of the sump. I wanted to do the fuel pump and filter mounting a bit differently from the stock location. Everything's a bit low to the ground there and there's not much protection from the road. Space is limited by the proximity of various frame parts and the wishbones. I also wanted to add some sort of post-pump fuel line filter.

I started with the easy part - mounting the regulator. Stock location is on the top of the tank, mounted on a 90 degree -8 elbow but it needs mechanical support as well. The Aeromotive regulator bracket isn't well suited to mounting in the Stalker's limited space around the tank so it has to be modified.

I cut the Aeromotive bracket off along the red line shown and added my own extension to it.
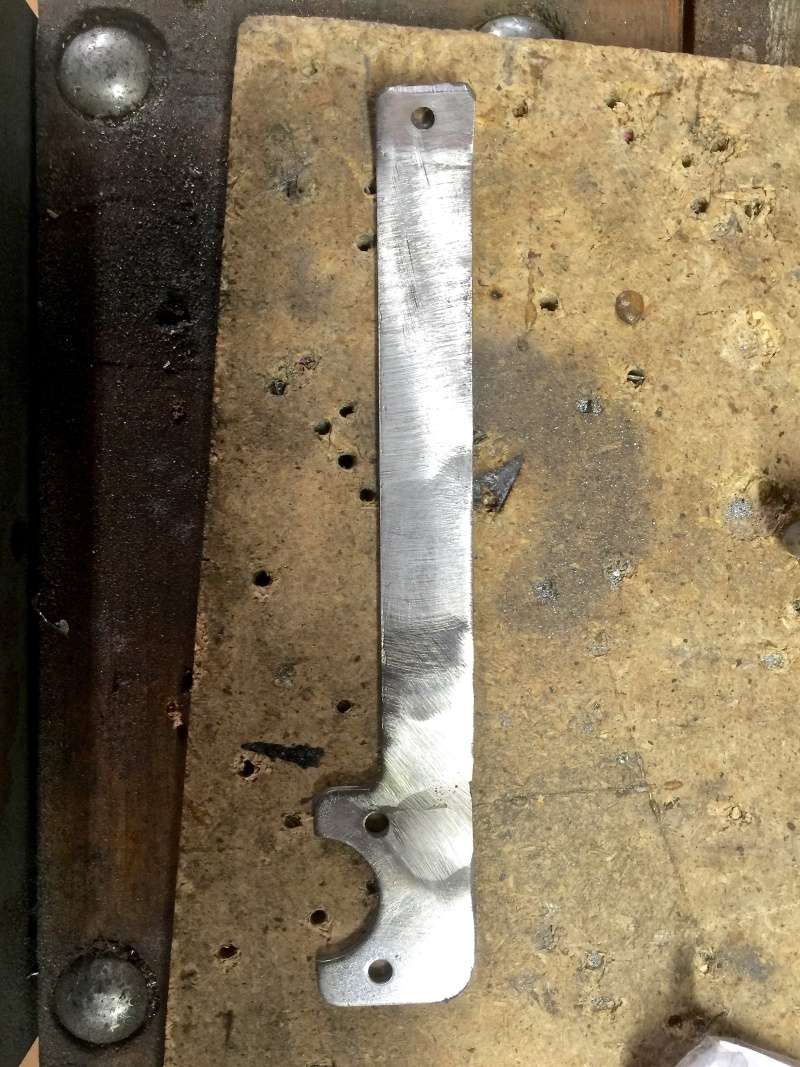
Welded and drilled to mount on the frame.

Corresponding hole drilled in the frame (finally - a use for that right-angle air tool).

First try at mounting the regulator. The bracket works well. I tried to orient the fuel pressure gauge facing upward but it protrudes above the frame so that won't work. For some reason, on my car, the entire top of the tank sits higher than expected. I talked to Scott about it and he had not seen that problem before.
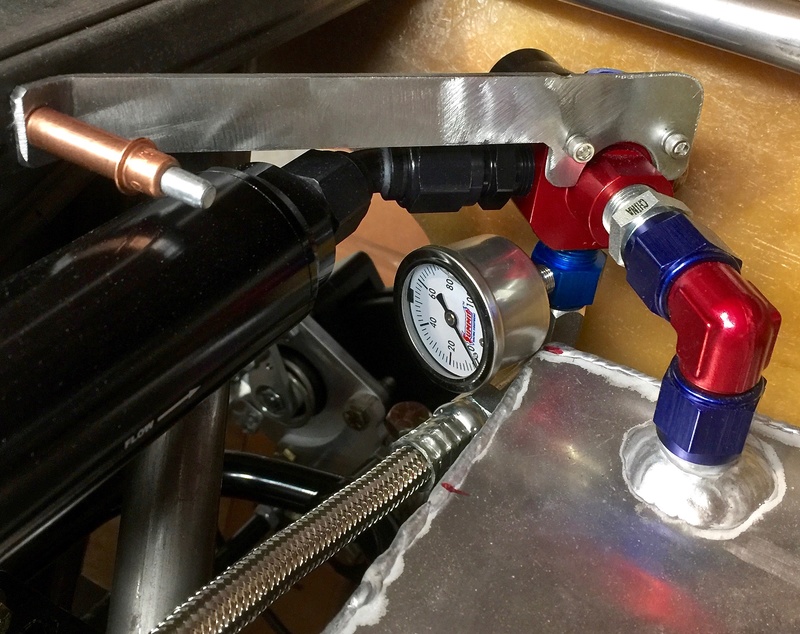
Jumping ahead, this arrangment works better. Everything fits but it took an additional adapter to do the job. I used Speedway part number 6177005 (Inline Fuel Pressure Adapter, -6 AN to 3/8 Inch NPT w/1/8 In NPT Port) and an aluminum pipe plug, Speedway part number 6176205 (Aluminum Allen Pipe Plugs, 3/8 Inch NPT) to shift everything around. I can still access the regulation adjuster screw on the top (well, side now) of the regulator. That's a 45 degree -8 elbow connected to the regulator input port.

Working backward toward the fuel pump through the 45 degree -8 elbow, this is a 10 micron fuel filter from Summit (Fuel Filter, Inline Mount, Billet Aluminum, Black, 10 Microns, -8 AN Inlet/Outlet, P/N SUM-230116-B). I swapped out the Walbro fuel pump coupler from -6 to -8 to match.
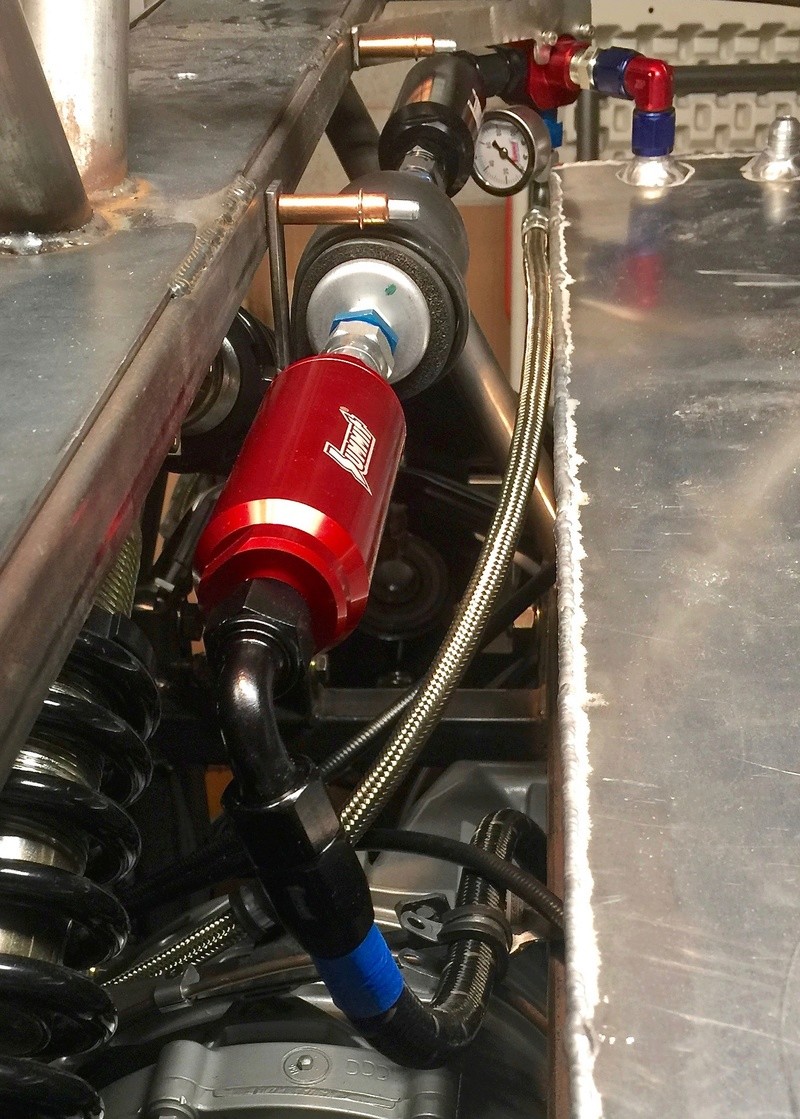
The fuel pump is mounted on a custom bracket made from 3/4x1/8 steel bar - basically an L-shape that the fuel pump clamps screw on to. There would be two two clamps only I've lost one of them. It's in a box somewhere and when it finally turns up I'll install it - I made the custom bracket long enough for both clamps. The pre-pump filter is another Summit part (Fuel Filter, Inline Mount, Billet Aluminum, Red, 100 Microns, -8 AN Inlet/Outlet P/N SUM-230118R).
I don't know for certain whether or not this fuel pump configuration is going to work given that the Walbro GSL392 pump is a pusher rather than a puller, but I talked with another owner, Ted who owns #154 and his pump and filters are installed in this configuration (i.e above the fuel tank), and this arrangement appears to work for him, so I'll try this for now.
The stainless braided line in the picture is the output line from the regulator leading up front.

Both pre- and post-pump filters are 1.75" diameter items. I am researching mounting clamp options as they will need to be physically secured alongside the fuel pump.

The line running up from the tank to the 100 micron filter is nylon-braided E85-rated line with -8 fittings. It's very easy to work with. I tried running 1/2" stainless hardline up from the tank but just couldn't get it right so this is my compromise for now. The braided line will be secured with a 5/8 hose clamp on the same bracket that supports the handbrake lines, brake hardline and fuel line leading forward to the engine bay.
So - to finish up the installation in the rear of the car I need to physically secure the filters with mounting clamps (to be sourced) and to find the missing fuel pump clamp and fit it.
-Dave
I'm using the Stalker Cars aluminum fuel tank which has a sump and a -8 takeoffpoint more or less in the center of the car on the rear of the sump. I wanted to do the fuel pump and filter mounting a bit differently from the stock location. Everything's a bit low to the ground there and there's not much protection from the road. Space is limited by the proximity of various frame parts and the wishbones. I also wanted to add some sort of post-pump fuel line filter.
I started with the easy part - mounting the regulator. Stock location is on the top of the tank, mounted on a 90 degree -8 elbow but it needs mechanical support as well. The Aeromotive regulator bracket isn't well suited to mounting in the Stalker's limited space around the tank so it has to be modified.
I cut the Aeromotive bracket off along the red line shown and added my own extension to it.
Welded and drilled to mount on the frame.
Corresponding hole drilled in the frame (finally - a use for that right-angle air tool).
First try at mounting the regulator. The bracket works well. I tried to orient the fuel pressure gauge facing upward but it protrudes above the frame so that won't work. For some reason, on my car, the entire top of the tank sits higher than expected. I talked to Scott about it and he had not seen that problem before.
Jumping ahead, this arrangment works better. Everything fits but it took an additional adapter to do the job. I used Speedway part number 6177005 (Inline Fuel Pressure Adapter, -6 AN to 3/8 Inch NPT w/1/8 In NPT Port) and an aluminum pipe plug, Speedway part number 6176205 (Aluminum Allen Pipe Plugs, 3/8 Inch NPT) to shift everything around. I can still access the regulation adjuster screw on the top (well, side now) of the regulator. That's a 45 degree -8 elbow connected to the regulator input port.
Working backward toward the fuel pump through the 45 degree -8 elbow, this is a 10 micron fuel filter from Summit (Fuel Filter, Inline Mount, Billet Aluminum, Black, 10 Microns, -8 AN Inlet/Outlet, P/N SUM-230116-B). I swapped out the Walbro fuel pump coupler from -6 to -8 to match.
The fuel pump is mounted on a custom bracket made from 3/4x1/8 steel bar - basically an L-shape that the fuel pump clamps screw on to. There would be two two clamps only I've lost one of them. It's in a box somewhere and when it finally turns up I'll install it - I made the custom bracket long enough for both clamps. The pre-pump filter is another Summit part (Fuel Filter, Inline Mount, Billet Aluminum, Red, 100 Microns, -8 AN Inlet/Outlet P/N SUM-230118R).
I don't know for certain whether or not this fuel pump configuration is going to work given that the Walbro GSL392 pump is a pusher rather than a puller, but I talked with another owner, Ted who owns #154 and his pump and filters are installed in this configuration (i.e above the fuel tank), and this arrangement appears to work for him, so I'll try this for now.
The stainless braided line in the picture is the output line from the regulator leading up front.
Both pre- and post-pump filters are 1.75" diameter items. I am researching mounting clamp options as they will need to be physically secured alongside the fuel pump.
The line running up from the tank to the 100 micron filter is nylon-braided E85-rated line with -8 fittings. It's very easy to work with. I tried running 1/2" stainless hardline up from the tank but just couldn't get it right so this is my compromise for now. The braided line will be secured with a 5/8 hose clamp on the same bracket that supports the handbrake lines, brake hardline and fuel line leading forward to the engine bay.
So - to finish up the installation in the rear of the car I need to physically secure the filters with mounting clamps (to be sourced) and to find the missing fuel pump clamp and fit it.
-Dave

comled- Posts : 179
Join date : 2015-10-07
Location : New Hope, PA -

Re: Classic R #27 Build - Fuel System
![]() by comled Wed Sep 07, 2016 11:32 pm
by comled Wed Sep 07, 2016 11:32 pm
Managed to get both filters mounted with adel clamps to the frame:


The clamps are slightly oversized so I will add some closed cell foam padding just to fill the gap around the clamp. Otherwise the whole assembly seems pretty secure. Of course the final test is still whether the pump will operate in this elevated position relative to the tank...
-Dave
The clamps are slightly oversized so I will add some closed cell foam padding just to fill the gap around the clamp. Otherwise the whole assembly seems pretty secure. Of course the final test is still whether the pump will operate in this elevated position relative to the tank...
-Dave
comled- Posts : 179
Join date : 2015-10-07
Location : New Hope, PA -
Re: Classic R #27 Build - Fuel System
![]() by comled Sat Jul 01, 2017 8:57 pm
by comled Sat Jul 01, 2017 8:57 pm
Since hood clearance is at a premium for me I've been planning how to rework the fuel rail to eliminate the tube that crosses over the top of the UIM. I have been accumulating parts over the past couple of weeks and started work on it last weekend.
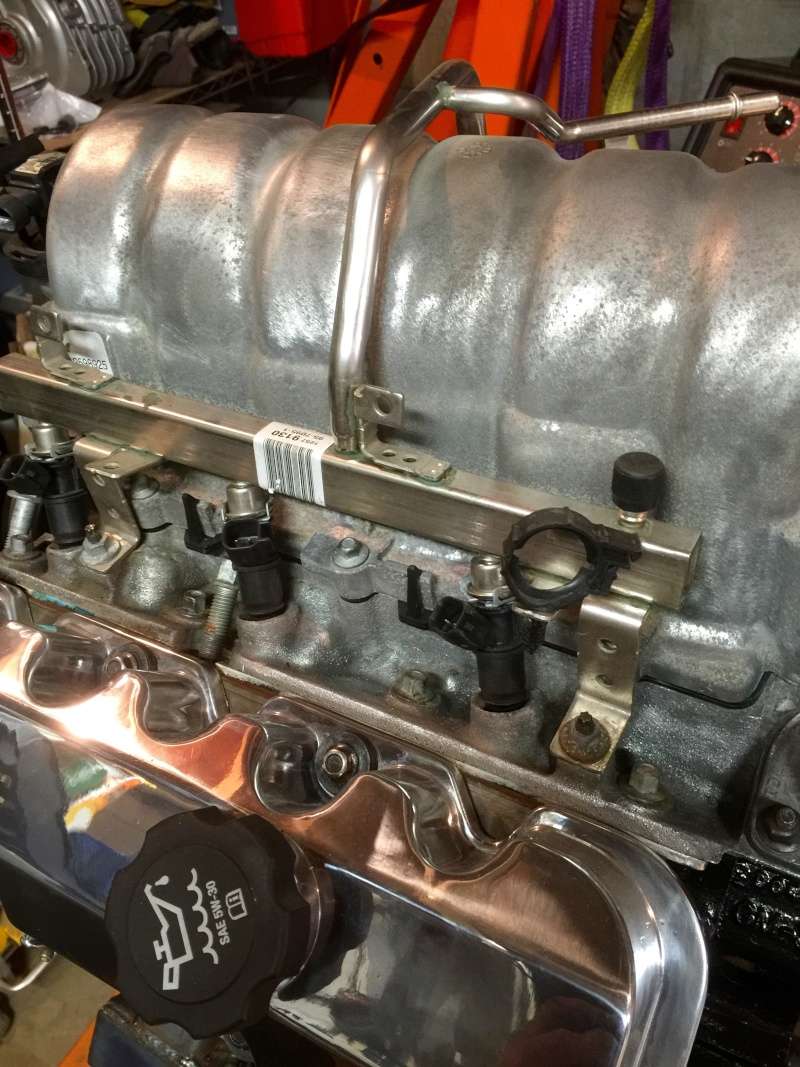
You can see in this image from early on in the project how much clearance would be required to accommodate the stock fuel rail and fuel feed. I want to eliminate that tube that runs across the top.
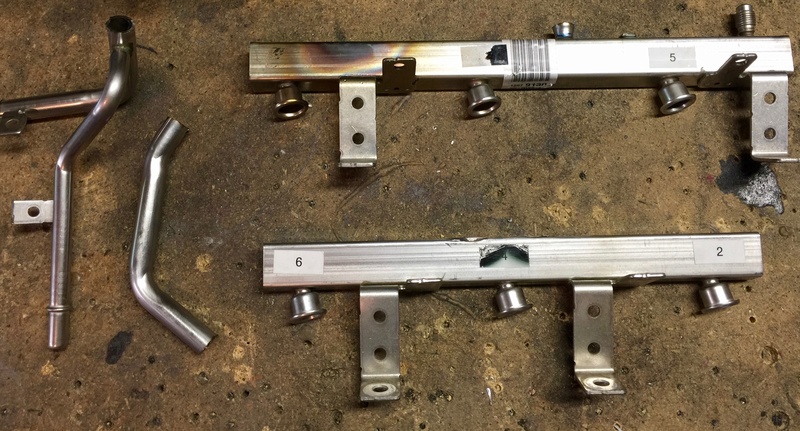
I cut the cross tube off the fuel rail, separating it into two individual rails. The tubing is fairly thin-walled stainless and it cuts easily with an air cutting tool, but you have to be careful not to nick the rails accidentally. I went slowly and checked the cut every few seconds. I also cut off some unnecessary brackets and ground away most of what was left. The heat discoloration around port 1 is left over from where I tried to melt the braze that had been used to assemble the rails originally. Needless to say it did not work and I was left with cutting the feed tube off.
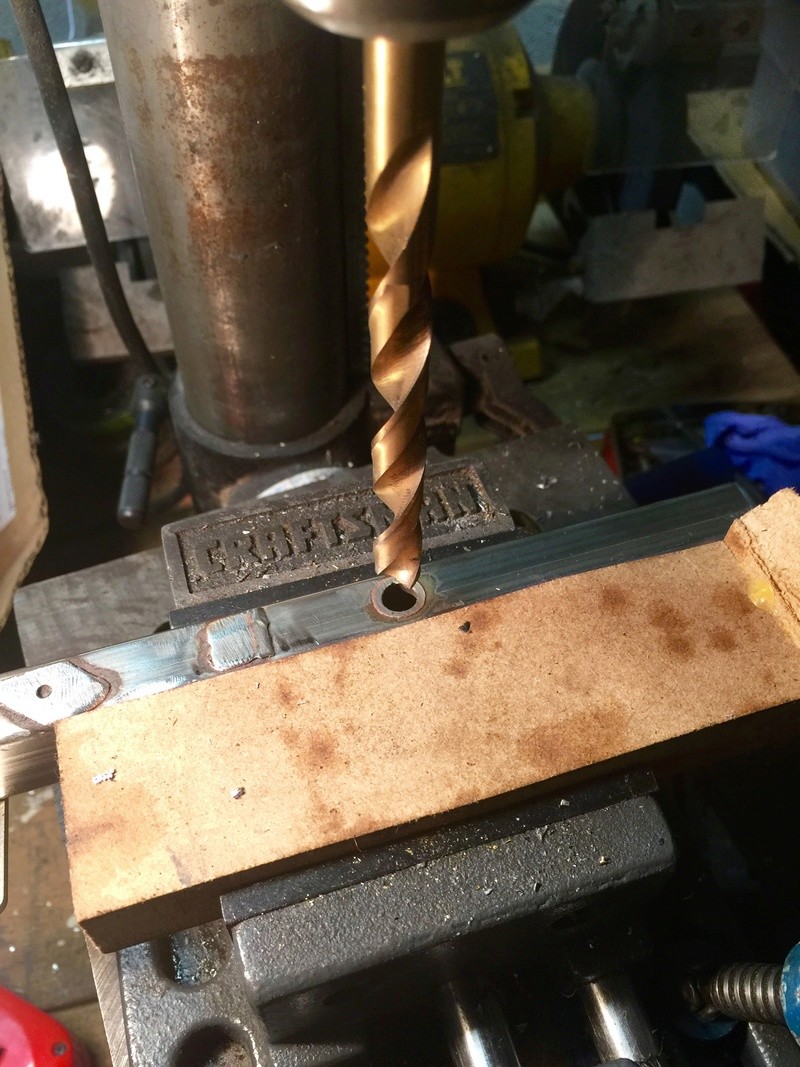
Since the original tubes were 1/2" OD, I want to replace the feed tubes with -8 male flare fittings. I found some stainless weld-in bungs type fittings for a couple of bucks apiece. To accommodate the bungs, the remnants of the feed tube have to be drilled out to 1/2". This takes several passes with the drill press, enlarging the hole a little at a time. Because it's stainless, the metal is included to work harden during drilling so I took my time and used a lot of cutting oil to keep things cool. After drilling I blew as much of the debris out of the assembly with compressed air as I could. I'll have to do a more intensive cleaning later before assembly.

The -8 bung press fits snugly into the hole. I will be silver soldering these in so prep work is key. I deburred the hole, then used 150 grit paper and a wire brush to get the fuel rail shiny clean. Finally I degreased both the bung and the rail with lacquer thinner and a paper towel.
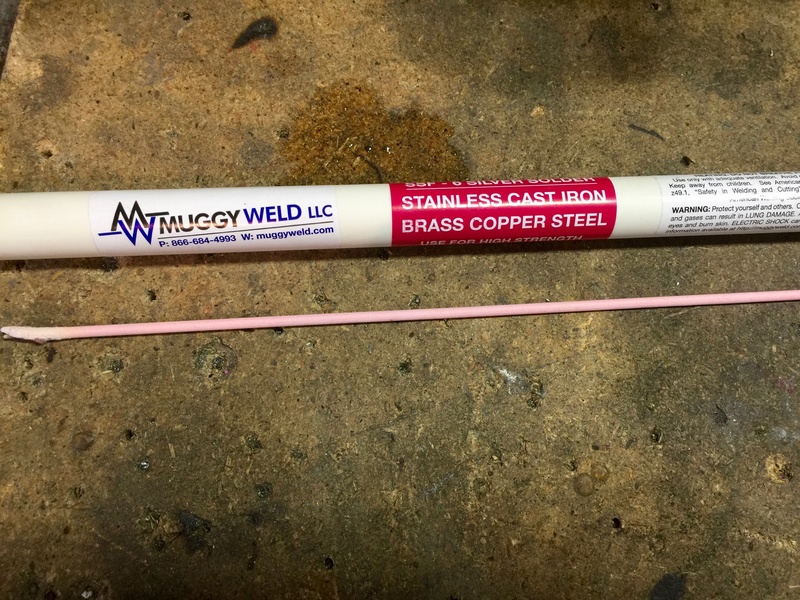
I used Muggyweld SS6 silver solder. It's expensive but a little goes a long way.

I was skeptical about whether it would be any good but I have to say it performed beautifully. If you get everything hot to the point where the flux can melt, you can flux the entire joint and confirm that it's flowed all the way round, then continue to heat until the silver sold melts and flows around the joint. Of course the proof will be whether it holds pressure, but I am confident it will be fine.
Next I'll work on stainless hardlines to feed the rails. If they don't work out, my backup plan is to make stainless braided lines with 90 degree ends. Either way I am happy with how this is going so far.
-Dave
You can see in this image from early on in the project how much clearance would be required to accommodate the stock fuel rail and fuel feed. I want to eliminate that tube that runs across the top.
I cut the cross tube off the fuel rail, separating it into two individual rails. The tubing is fairly thin-walled stainless and it cuts easily with an air cutting tool, but you have to be careful not to nick the rails accidentally. I went slowly and checked the cut every few seconds. I also cut off some unnecessary brackets and ground away most of what was left. The heat discoloration around port 1 is left over from where I tried to melt the braze that had been used to assemble the rails originally. Needless to say it did not work and I was left with cutting the feed tube off.
Since the original tubes were 1/2" OD, I want to replace the feed tubes with -8 male flare fittings. I found some stainless weld-in bungs type fittings for a couple of bucks apiece. To accommodate the bungs, the remnants of the feed tube have to be drilled out to 1/2". This takes several passes with the drill press, enlarging the hole a little at a time. Because it's stainless, the metal is included to work harden during drilling so I took my time and used a lot of cutting oil to keep things cool. After drilling I blew as much of the debris out of the assembly with compressed air as I could. I'll have to do a more intensive cleaning later before assembly.
The -8 bung press fits snugly into the hole. I will be silver soldering these in so prep work is key. I deburred the hole, then used 150 grit paper and a wire brush to get the fuel rail shiny clean. Finally I degreased both the bung and the rail with lacquer thinner and a paper towel.
I used Muggyweld SS6 silver solder. It's expensive but a little goes a long way.
I was skeptical about whether it would be any good but I have to say it performed beautifully. If you get everything hot to the point where the flux can melt, you can flux the entire joint and confirm that it's flowed all the way round, then continue to heat until the silver sold melts and flows around the joint. Of course the proof will be whether it holds pressure, but I am confident it will be fine.
Next I'll work on stainless hardlines to feed the rails. If they don't work out, my backup plan is to make stainless braided lines with 90 degree ends. Either way I am happy with how this is going so far.
-Dave
comled- Posts : 179
Join date : 2015-10-07
Location : New Hope, PA -
Re: Classic R #27 Build - Fuel System
![]() by comled Sat Jul 08, 2017 8:58 am
by comled Sat Jul 08, 2017 8:58 am
The lines feeding the fuel rail are 1/2" stainless, 0.049" wall thickness (Mcmaster Smooth-Bore Seamless 304 Stainless Steel Tubing, 1/2" OD, 0.049" Wall Thickness, 6 Feet Long, P/N 89895K745). I'm using stainless sleeves, nuts and other fittings.

The tubing flares very nicely with a Rigid 377 flare tool. I did not have any issues with the tubing splitting or malforming. A drop of oil on the flaring face of the tool helps things along.

Here's the prototype fuel line I made for the passenger side of the car. The bends are not particularly smooth as this was a discarded piece from another project that already had a 90 degree bend. I may or may not make another one depending upon how much material I have left. It's adequate for now.

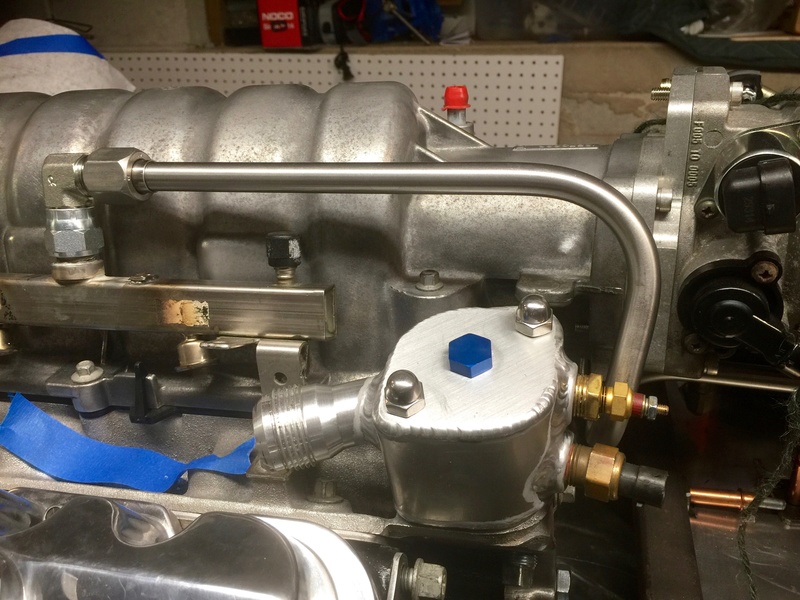
The injector rail bolted temporarily in place, and the line fitted using a 90 elbow that I had in my AN fittings box. This gets replaced later with a stainless elbow.

To temporarily install the injector rail on the driver's side I had to mess with the mounting hardware a little. Normally there's a stud and nut in the LIM but because of the routing of my coolant hose, I have to replace it with a bolt. This is just what I had on hand for now: it's a battery terminal screw.

It's probably easier to visualize the whole assembly off the car.
The driver's side fuel line is a bit more complicated because its routing has to negotiate the water neck and temperature senders.

Viewed from above.
Still to do: provide mechanical support for the tubing by attaching lugs and bolting them to the engine. The line from the fuel pump is compliant so it should absorb engine movement, but the tee that it it connects to needs to be supported.
-Dave
The tubing flares very nicely with a Rigid 377 flare tool. I did not have any issues with the tubing splitting or malforming. A drop of oil on the flaring face of the tool helps things along.
Here's the prototype fuel line I made for the passenger side of the car. The bends are not particularly smooth as this was a discarded piece from another project that already had a 90 degree bend. I may or may not make another one depending upon how much material I have left. It's adequate for now.
The injector rail bolted temporarily in place, and the line fitted using a 90 elbow that I had in my AN fittings box. This gets replaced later with a stainless elbow.
To temporarily install the injector rail on the driver's side I had to mess with the mounting hardware a little. Normally there's a stud and nut in the LIM but because of the routing of my coolant hose, I have to replace it with a bolt. This is just what I had on hand for now: it's a battery terminal screw.
It's probably easier to visualize the whole assembly off the car.
The driver's side fuel line is a bit more complicated because its routing has to negotiate the water neck and temperature senders.
Viewed from above.
Still to do: provide mechanical support for the tubing by attaching lugs and bolting them to the engine. The line from the fuel pump is compliant so it should absorb engine movement, but the tee that it it connects to needs to be supported.
-Dave
comled- Posts : 179
Join date : 2015-10-07
Location : New Hope, PA -
» Classic R #27 Build - Fuel Tank Sender
» Classic R #27 Build - Exhaust System
» Classic R #27 Build - Cooling System
» Classic R #27 Build - Frame
» Classic R #27 Build - Windshield
» Classic R #27 Build - Exhaust System
» Classic R #27 Build - Cooling System
» Classic R #27 Build - Frame
» Classic R #27 Build - Windshield
Page 1 of 1
Permissions in this forum:
You cannot reply to topics in this forum|
|
|