Classic R #27 Build - Gear Shift
Page 1 of 1

Classic R #27 Build - Gear Shift
![]() by comled Sun Mar 27, 2016 9:33 am
by comled Sun Mar 27, 2016 9:33 am
A couple of weeks ago I received the gear shifter for #27. Although selecting this part was ultimately straightforward it did require some thought up front. My T5 transmission came out of a 2002 Camaro V6 which has a bellhousing that cants the transmission over to the left. The stock shifter is designed with this angle in mind. However, the bellhousing in the Stalker V6 comes from a 94 Chevy S10 - which doesn't cant the transmission over at an angle. So it seems you can't just bolt in a Camaro shifter and expect it to be right. A company called Core Shifters makes a shifter for this Camaro/S10 bellhousing combination purpose so I ordered one. There are various ordering options - I chose the one for the 5" stick length (described on my shipping confirmation as "Core / Hurst Shifter Base: T4 or T5 from 1982-1995 S10 truck - 2.00" for 5" stick length")
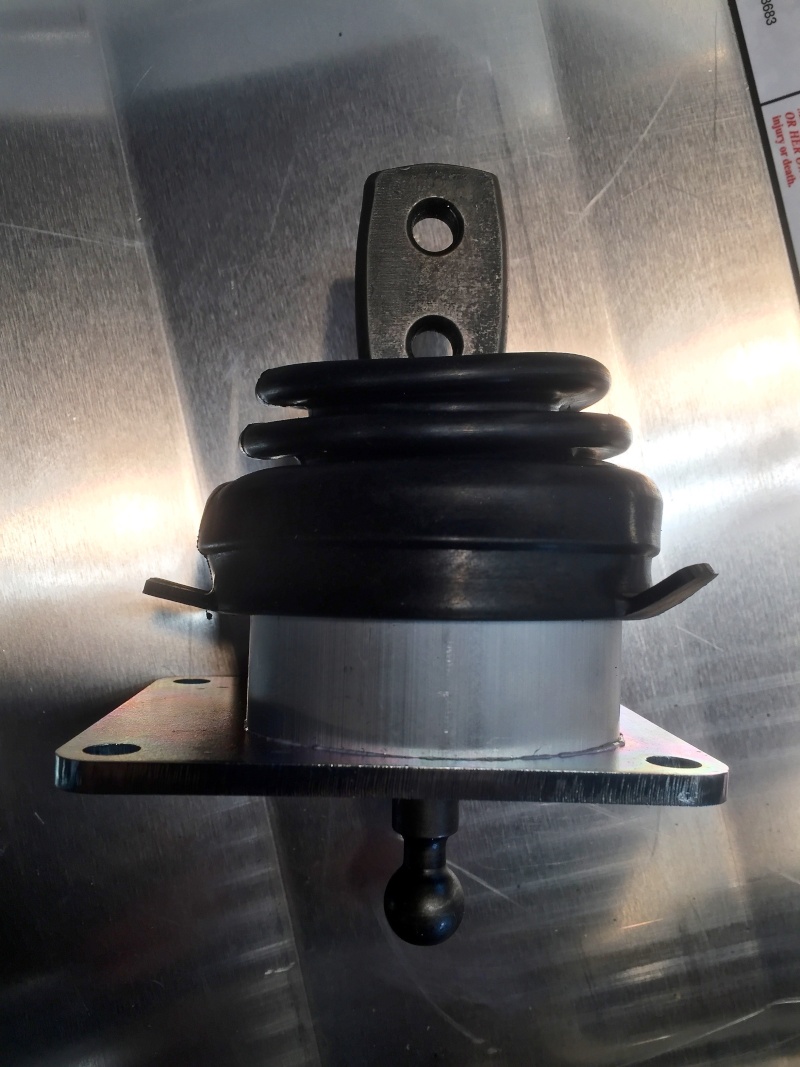
This is what you get, plus four bolts for mounting it. Seems pretty solid but quite weighty. This is not like one of the low-cost aluminum Mustang T5 shifters you see advertised on eBay (which won't fit as far as I can tell - the shift cup and the mounting holes locations are different). I haven't opened it up to see what's inside.
I didn't order the stick at the same time as the shifter because I wanted to see how the shifter aligns with the dash and the tunnel cover. It bolted right into the transmission extension just fine.

Viewed from the side you can see that the 2" version I ordered plays nicely with the tunnel top. It's just in front of the dash as well. I should be able to make this work - I'll get the dash mounted and see what my options are for the stick.
-Dave
This is what you get, plus four bolts for mounting it. Seems pretty solid but quite weighty. This is not like one of the low-cost aluminum Mustang T5 shifters you see advertised on eBay (which won't fit as far as I can tell - the shift cup and the mounting holes locations are different). I haven't opened it up to see what's inside.
I didn't order the stick at the same time as the shifter because I wanted to see how the shifter aligns with the dash and the tunnel cover. It bolted right into the transmission extension just fine.
Viewed from the side you can see that the 2" version I ordered plays nicely with the tunnel top. It's just in front of the dash as well. I should be able to make this work - I'll get the dash mounted and see what my options are for the stick.
-Dave

comled- Posts : 179
Join date : 2015-10-07
Location : New Hope, PA -

Re: Classic R #27 Build - Gear Shift
![]() by comled Sun Apr 03, 2016 8:44 am
by comled Sun Apr 03, 2016 8:44 am
I made up a shift stick from various bits of bar stock, tubing and rod. My goal here is to get the shift knob reasonably low and to move it back a bit from the dash.

This is the adapter part that attaches to the shifter. The holes are 3/8" diameter spaced 7/8" apart, and the part is 5/16" thick so it's quite solid and won't bend.

I marked up where the tubing will come in from the side and cut that section out.

3/8" ID diameter tube welded in and a 3/8" diameter rod bent and added. That rod will end up getting cut to length and tapped to accept the shift knob once I work out where the shifter will be.

I haven't permanently installed the inner rod yet - keeping my options open until I decide exactly where I want that shift knob to end up. I may still shorten the whole thing as it still looks a bit up in the air to me.
-Dave
This is the adapter part that attaches to the shifter. The holes are 3/8" diameter spaced 7/8" apart, and the part is 5/16" thick so it's quite solid and won't bend.
I marked up where the tubing will come in from the side and cut that section out.
3/8" ID diameter tube welded in and a 3/8" diameter rod bent and added. That rod will end up getting cut to length and tapped to accept the shift knob once I work out where the shifter will be.
I haven't permanently installed the inner rod yet - keeping my options open until I decide exactly where I want that shift knob to end up. I may still shorten the whole thing as it still looks a bit up in the air to me.
-Dave
comled- Posts : 179
Join date : 2015-10-07
Location : New Hope, PA -
Re: Classic R #27 Build - Gear Shift
![]() by comled Mon Jun 13, 2016 7:01 am
by comled Mon Jun 13, 2016 7:01 am
In order to run the shift mechanism through the top tunnel cover I'd originally made a small, squarish hole, but that didn't really make sense since the gearshift boot is a round section where it passes through the cover.

I happened to have a 2 3/4" hole saw on hand from another project and this was the perfect size for the boot. Because I'd already cut out a square section from the panel there was nowhere to run the pilot hole into so I clamped the panel to some scrap wood, marked the center point of the square transmission extension on the wood and made the cut, which I then finished with a short length of rubber U-channel to mask the sharp edge and protect the boot where it passes through.

The finished result worked out well. The boot is a snug fit up against the hole, hopefully tight enough to keep out road dirt. Next I want to make a dressier aluminum shifter to mount to the steel extension I'd made previously. The whole thing will be finished with a vinyl shift boot and Lokar billet trim ring.
-Dave
I happened to have a 2 3/4" hole saw on hand from another project and this was the perfect size for the boot. Because I'd already cut out a square section from the panel there was nowhere to run the pilot hole into so I clamped the panel to some scrap wood, marked the center point of the square transmission extension on the wood and made the cut, which I then finished with a short length of rubber U-channel to mask the sharp edge and protect the boot where it passes through.
The finished result worked out well. The boot is a snug fit up against the hole, hopefully tight enough to keep out road dirt. Next I want to make a dressier aluminum shifter to mount to the steel extension I'd made previously. The whole thing will be finished with a vinyl shift boot and Lokar billet trim ring.
-Dave
comled- Posts : 179
Join date : 2015-10-07
Location : New Hope, PA -
Re: Classic R #27 Build - Gear Shift
![]() by comled Sat Jun 18, 2016 6:34 pm
by comled Sat Jun 18, 2016 6:34 pm
Spent the day making a turned aluminum gear shift lever that mounts over the steel tube on the extension. It took longer than I thought it would - about 6 hours in total.
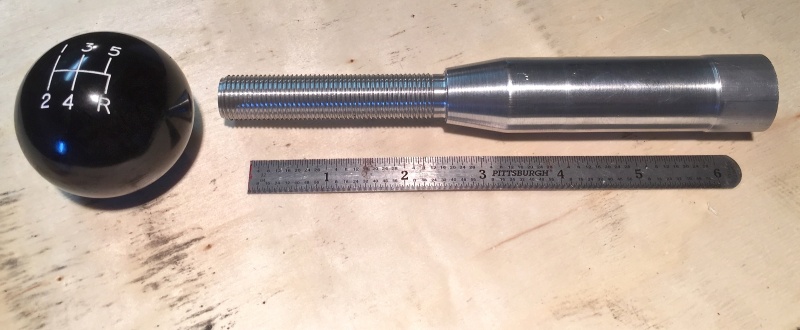
I made the threaded portion M16x1.5 to match the largest thread size supported by the shift knob (which is a Speed Dawg part). I also made both the threaded and smooth parts longer than they need to be so I can trim the overall length to fit.

Test fitting the gear shift. I will have to dig out the original box for the shift knob and see if it came with an M16x1.5 lock nut. Overall the shift lever is too long so will be trimmed to fit.
To finish this I need to cross drill and thread the base and install a pair of 5/16" grub screws that will lock it onto the steel tube.

Update: I found the M16x1.5 lock nut that came with the Speed Dawg shift knob kit so I installed it.
-Dave
I made the threaded portion M16x1.5 to match the largest thread size supported by the shift knob (which is a Speed Dawg part). I also made both the threaded and smooth parts longer than they need to be so I can trim the overall length to fit.
Test fitting the gear shift. I will have to dig out the original box for the shift knob and see if it came with an M16x1.5 lock nut. Overall the shift lever is too long so will be trimmed to fit.
To finish this I need to cross drill and thread the base and install a pair of 5/16" grub screws that will lock it onto the steel tube.
Update: I found the M16x1.5 lock nut that came with the Speed Dawg shift knob kit so I installed it.
-Dave
comled- Posts : 179
Join date : 2015-10-07
Location : New Hope, PA -
» Classic R #27 Build - Starter Motor and Ring Gear
» Classic R #27 Build
» Classic R #27 Build - Hubs, Calipers, Flexible Brake Hoses
» Classic R #27 Build - Frame
» Classic R #27 Build - Lighting
» Classic R #27 Build
» Classic R #27 Build - Hubs, Calipers, Flexible Brake Hoses
» Classic R #27 Build - Frame
» Classic R #27 Build - Lighting
Page 1 of 1
Permissions in this forum:
You cannot reply to topics in this forum|
|
|