Classic R #27 Build - Throttle Body and Engine Dry Fit
Page 1 of 1

Re: Classic R #27 Build - Throttle Body and Engine Dry Fit
![]() by comled Fri Jan 15, 2016 8:09 am
by comled Fri Jan 15, 2016 8:09 am
A box of parts from Brunton arrived Wednesday which included the exhausts, ECU and ZZP Northstar throttle body kit.
I wanted to do a test mount of the new throttle body as part of my hood clearance evaluation. The instructions in the kit are a bit thin but it seems straightforward once you think about it. I realize that for seasoned builders of engine projects this stuff is probably self-evident but for a total fuel injection neophyte like me a lot of this stuff is firmly in head-scratching territory.

The parts I received were the throttle body adapter plate, throttle body (used), silicon coupler (not shown), mass air flow sensor, harness (not shown), instructions (not shown) and a bag of socket cap screws.
I'd already removed the old throttle body and set it aside. As I tried to match the adapter plate up to the new body I couldn't see how the plate would clear the two alignment pins on the throttle body.

On closer inspection, these pins are springy and can be removed. Compress the pin with a pair of pliers and it pops right out. There are two of them.

On the upper manifold, you have to remove the two studs that are in the head. Unlike my MGB engine GM has these handy 'modern' studs that unscrew with application of a suitable tool. Nice!

A 4mm quarter-inch square drive socket was a good fit for removing the studs.

The adaptor plate mounts so the recesses for the socket cap screws face outwards. Four screws hold it in place. I don't know what the torque setting for these screws should be but I wouldn't be too heavy handed with it in case the adapter plate deforms and causes leaks. I'd tentatively treat it the same as a carburetor flange.


The throttle body mounts with three screws. The hose barb goes at the top.

The silicon coupler attaches the mass air flow sensor to the throttle body. It fits over the throttle body and is held on with a hose clamp.

The MAF goes on the other end of the silicon coupler. It has an arrow on the side indicating the direction of flow so even I can't put it on back to front. I assume it can be rotated for a convenient fit relative to other components.
The ZZP web page for this kit also shows a throttle cable bracket. This isn't included in the Brunton shipment but evidently isn't needed because the throttle pedal assembly handles aligning the cable to the throttle cable quadrant. I was wondering what to do with that hose port on the throttle body assembly and I believe I will just cap it off with a vacuum port cap.
On the subject of fuel systems, I realized a while back that I would have to modify the fuel injector rail hardline to assist in hood clearance. There's a piece of hardline tubing connecting the left and right fuel rails and it passes over the top of the upper intake manifold. I would like to re-route it so that it passes around the end of the manifold instead.

Here's where the hardline runs currently. It adds a good inch or so to the top of the engine.

The diameter of the tube in the areas I'd have to cut it is 1/2" and the tube is stainless. I'm thinking about my options for how to couple the tube to a braided fuel line - or another piece of hardline for that matter. Anyway, as a precursor to that job I removed the entire fuel rail assembly.

Each fuel injector has a clip on it. I removed all of them and also the nuts holding the mounting brackets in place.

The rails come off with the fuel injectors attached. I pulled them off the rail, numbered them and put them back in the engine so as not to leave any gaping holes. I capped each one with a bit of tape to keep dust out.
Now with the rail free I can figure out how to modify it. It looks as though I may have to spring for a 37 degree flaring tool capable of doing stainless flares for AN fittings. I'm not sure about compression fitting in this case. From what I've read, even the proper stainless AN compression fittings may have long term reliability issues.
I wanted to do a test mount of the new throttle body as part of my hood clearance evaluation. The instructions in the kit are a bit thin but it seems straightforward once you think about it. I realize that for seasoned builders of engine projects this stuff is probably self-evident but for a total fuel injection neophyte like me a lot of this stuff is firmly in head-scratching territory.
The parts I received were the throttle body adapter plate, throttle body (used), silicon coupler (not shown), mass air flow sensor, harness (not shown), instructions (not shown) and a bag of socket cap screws.
I'd already removed the old throttle body and set it aside. As I tried to match the adapter plate up to the new body I couldn't see how the plate would clear the two alignment pins on the throttle body.
On closer inspection, these pins are springy and can be removed. Compress the pin with a pair of pliers and it pops right out. There are two of them.
On the upper manifold, you have to remove the two studs that are in the head. Unlike my MGB engine GM has these handy 'modern' studs that unscrew with application of a suitable tool. Nice!
A 4mm quarter-inch square drive socket was a good fit for removing the studs.
The adaptor plate mounts so the recesses for the socket cap screws face outwards. Four screws hold it in place. I don't know what the torque setting for these screws should be but I wouldn't be too heavy handed with it in case the adapter plate deforms and causes leaks. I'd tentatively treat it the same as a carburetor flange.
The throttle body mounts with three screws. The hose barb goes at the top.
The silicon coupler attaches the mass air flow sensor to the throttle body. It fits over the throttle body and is held on with a hose clamp.
The MAF goes on the other end of the silicon coupler. It has an arrow on the side indicating the direction of flow so even I can't put it on back to front. I assume it can be rotated for a convenient fit relative to other components.
The ZZP web page for this kit also shows a throttle cable bracket. This isn't included in the Brunton shipment but evidently isn't needed because the throttle pedal assembly handles aligning the cable to the throttle cable quadrant. I was wondering what to do with that hose port on the throttle body assembly and I believe I will just cap it off with a vacuum port cap.
On the subject of fuel systems, I realized a while back that I would have to modify the fuel injector rail hardline to assist in hood clearance. There's a piece of hardline tubing connecting the left and right fuel rails and it passes over the top of the upper intake manifold. I would like to re-route it so that it passes around the end of the manifold instead.
Here's where the hardline runs currently. It adds a good inch or so to the top of the engine.
The diameter of the tube in the areas I'd have to cut it is 1/2" and the tube is stainless. I'm thinking about my options for how to couple the tube to a braided fuel line - or another piece of hardline for that matter. Anyway, as a precursor to that job I removed the entire fuel rail assembly.
Each fuel injector has a clip on it. I removed all of them and also the nuts holding the mounting brackets in place.
The rails come off with the fuel injectors attached. I pulled them off the rail, numbered them and put them back in the engine so as not to leave any gaping holes. I capped each one with a bit of tape to keep dust out.
Now with the rail free I can figure out how to modify it. It looks as though I may have to spring for a 37 degree flaring tool capable of doing stainless flares for AN fittings. I'm not sure about compression fitting in this case. From what I've read, even the proper stainless AN compression fittings may have long term reliability issues.

comled- Posts : 179
Join date : 2015-10-07
Location : New Hope, PA -

Classic R #27 Build - Throttle Body and Engine Dry Fit
![]() by comled Sat Jan 16, 2016 8:11 am
by comled Sat Jan 16, 2016 8:11 am
Here are a couple of pictures from earlier this week when I did a test fit of the engine. I bolted up the engine, bellhousing and transmission minus the flywheel and clutch so I could drop the engine in the chassis. Note that I did this without having the firewall shelf installed. I also removed the sheet metal around the tunnel to avoid clouting it with the transmission extension and damaging it.

The shop crane is on the half-ton setting which gives me maximum clearance and lift. I was working on my own but I used a load leveler to get the angle on the engine as I lined it up. You need a pretty sharp angle for the transmission to clear the firewall chassis member at the same time as the oil pan is clearing the front upper chassis member, then you need to drop it down and level it to get the whole thing forward. The trick is getting the right motor mount and the oil filter bracket not to snag on the chassis as it goes in. As long as they don't catch it on anything it can be done as a one-man job.
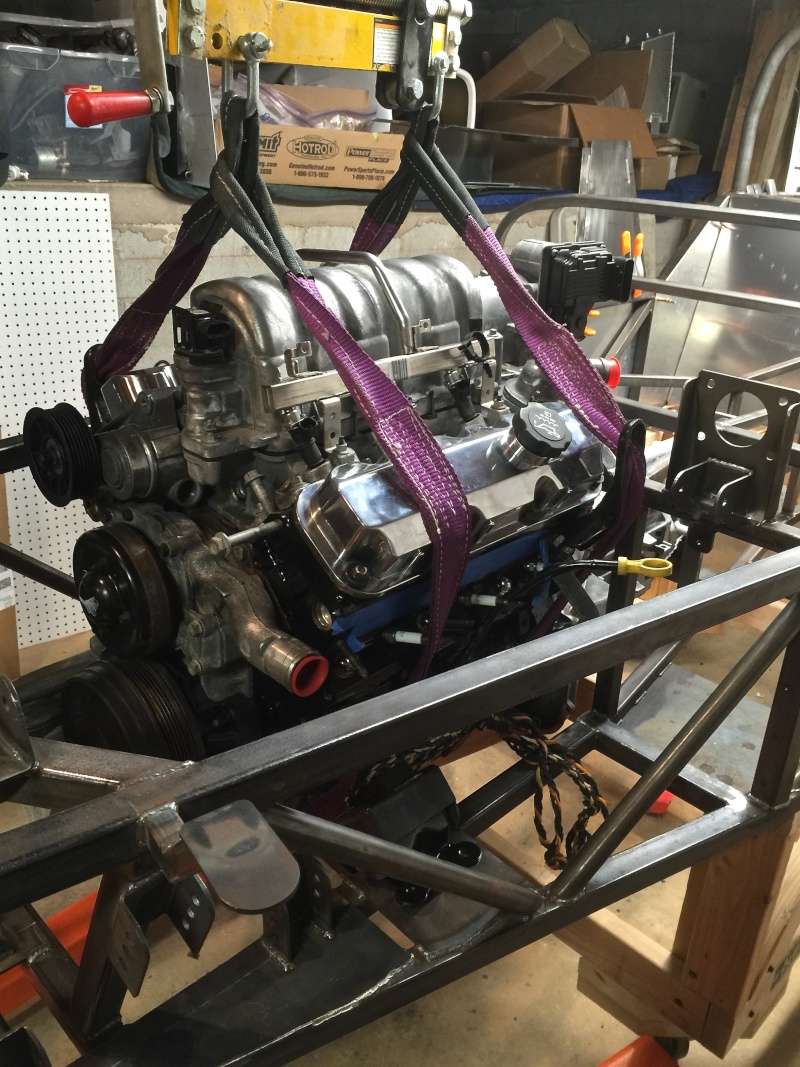
Engine leveled off and ready to bolt in.

Engine in place, shop crane gone. The front of the chassis will want to tip forward with the weight of the engine and transmission so it's resting on jack stands.
The shop crane is on the half-ton setting which gives me maximum clearance and lift. I was working on my own but I used a load leveler to get the angle on the engine as I lined it up. You need a pretty sharp angle for the transmission to clear the firewall chassis member at the same time as the oil pan is clearing the front upper chassis member, then you need to drop it down and level it to get the whole thing forward. The trick is getting the right motor mount and the oil filter bracket not to snag on the chassis as it goes in. As long as they don't catch it on anything it can be done as a one-man job.
Engine leveled off and ready to bolt in.
Engine in place, shop crane gone. The front of the chassis will want to tip forward with the weight of the engine and transmission so it's resting on jack stands.
comled- Posts : 179
Join date : 2015-10-07
Location : New Hope, PA -
Re: Classic R #27 Build - Throttle Body and Engine Dry Fit
![]() by comled Sat Apr 09, 2016 9:54 am
by comled Sat Apr 09, 2016 9:54 am
I continued the throttle body installation by dry fitting the air filter. This was dependent on having the firewall shelf in place plus the other items that could potentially occupy the space between the throttle body and the engine: the brake booster, brake master cylinder, brake lines and throttle pedal. With all that done the air filter has to fit in the remaining available space.

The filter I used is K&N part number KNN-RU-4250. The tight bend is a 4" aluminum elbow coupled to the MAF with a 4" silicon coupler trimmed at an angle to fit.
BTW that cardboard box in the background is my mockup of an Odyssey PC680 battery. I also have the coil pack sitting loose on the firewall shelf while I work out what to do with it.

There will be some tidying up to do but this is the basic setup I'll use.
The filter I used is K&N part number KNN-RU-4250. The tight bend is a 4" aluminum elbow coupled to the MAF with a 4" silicon coupler trimmed at an angle to fit.
BTW that cardboard box in the background is my mockup of an Odyssey PC680 battery. I also have the coil pack sitting loose on the firewall shelf while I work out what to do with it.
There will be some tidying up to do but this is the basic setup I'll use.
comled- Posts : 179
Join date : 2015-10-07
Location : New Hope, PA -
» Classic R #27 Build
» Classic R #27 Build - Frame
» Classic R #27 Build - Windshield
» Classic R #27 Build - Hubs, Calipers, Flexible Brake Hoses
» Classic R #27 Build - Lighting
» Classic R #27 Build - Frame
» Classic R #27 Build - Windshield
» Classic R #27 Build - Hubs, Calipers, Flexible Brake Hoses
» Classic R #27 Build - Lighting
Page 1 of 1
Permissions in this forum:
You cannot reply to topics in this forum|
|
|