Classic R #27 Build - Front and Rear Suspension Dry Fit
2 posters
Page 1 of 1

Re: Classic R #27 Build - Front and Rear Suspension Dry Fit
![]() by comled Tue Jan 26, 2016 4:27 pm
by comled Tue Jan 26, 2016 4:27 pm
I cut and fitted the firewall shelf toward the end of last week and here are some observations on getting the job done.


The L-shaped panel is quite generously sized but one face is slightly longer than the other. I chose the face that most nearly matched the height of the scuttle to be the vertical face. Notching was straightforward but I don't recall anything in the build video about notching for the brake booster. I think that's the only place I deviated - that and I've held off drilling any mounting holes other than along the front edge because I'm not sure yet how I'm going to position my battery and fuse box, and I don't want do anything to constrain the placement of those parts yet.

To get the line to trim around for the scuttle, I traced round the outer edge of the scuttle, then measured in an inch all the way around, except where the panel meets the outer edges of the frame. There I used the actual line off the frame and joined it up with the curve from the scuttle. The resulting fit was fine.
The L-shaped panel is quite generously sized but one face is slightly longer than the other. I chose the face that most nearly matched the height of the scuttle to be the vertical face. Notching was straightforward but I don't recall anything in the build video about notching for the brake booster. I think that's the only place I deviated - that and I've held off drilling any mounting holes other than along the front edge because I'm not sure yet how I'm going to position my battery and fuse box, and I don't want do anything to constrain the placement of those parts yet.
To get the line to trim around for the scuttle, I traced round the outer edge of the scuttle, then measured in an inch all the way around, except where the panel meets the outer edges of the frame. There I used the actual line off the frame and joined it up with the curve from the scuttle. The resulting fit was fine.

comled- Posts : 179
Join date : 2015-10-07
Location : New Hope, PA -

Re: Classic R #27 Build - Front and Rear Suspension Dry Fit
![]() by comled Tue Jan 26, 2016 6:13 pm
by comled Tue Jan 26, 2016 6:13 pm
Over the weekend I was able to get the rear suspension dry assembled. It's all a bit new and different and I must admit to a fair bit of head scratching while I tried to figure out how it all goes together. The videos are great and I'd have been dead in the water without them but somehow translating that information into an actual build was tricky.

One thing I should have done right at the outset: unpack the back of heim joints and inspect them. There are left- and right-handed ones, different shaft sizes and different thread sizes. It helps to pair the appropriate lock nut with each heim. Obviously - with hindsight - the heims for the tie rods have different thread directions at each end, since they form the toe-in adjustment for the spindle, but I didn't latch onto this for a while.
I took a bunch of notes from the videos and made sketches of what I though the correct assembly should be.
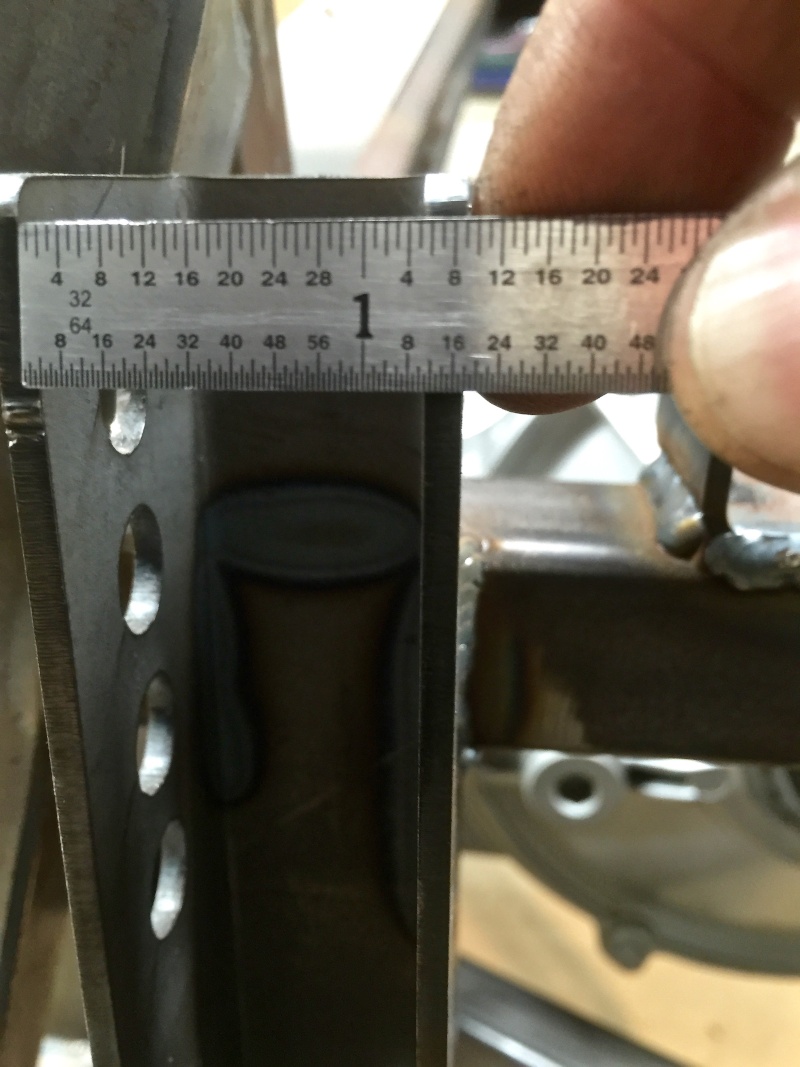
On my car, the channel that the A-arms fit into was just a fraction too small to accept a heim joint plus two cone spacers as directed in the video. I measured 1 5/32" on this top part; the required spacing was more like 1 3/8" to get everything packed in. Your mileage may vary.
In order to open up the gap a bit I used a bolt through one of the half inch holes with a nut either side of the channel, inside. This allowed me to open up the channel just enough to get everything installed.

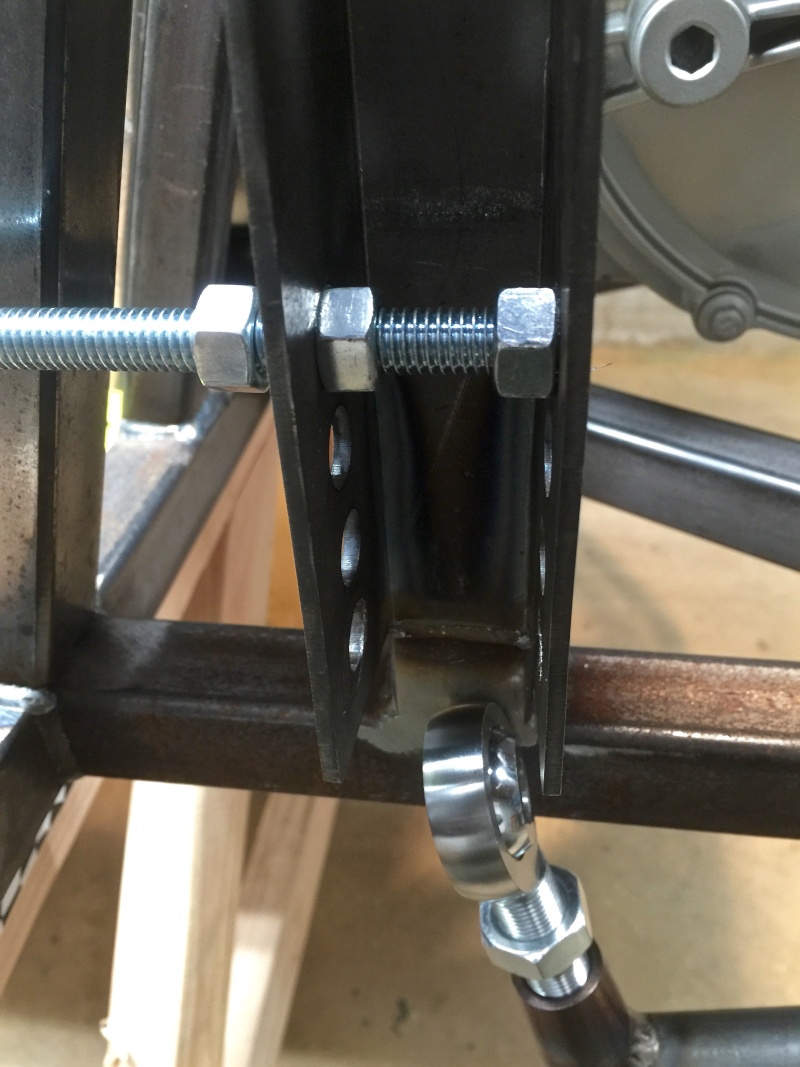
Here's an upper A-arm joint assembled with two cone spacers and the heim joint inside the channel frame mount. I still had to use a drift to get that last cone space in place. It's tighter than a gnat's chuff in there (as the saying goes).
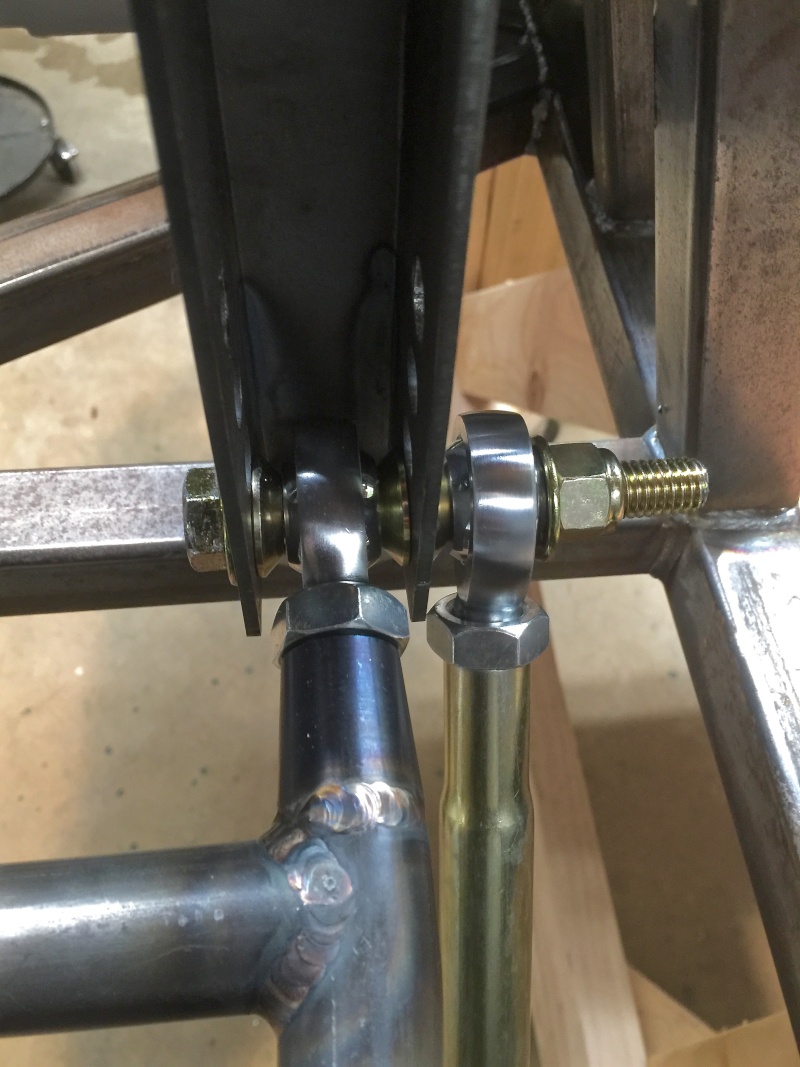
The rear lower A-arm mount point also gets the tie rod attached to it. 1/2" thread size heim, 1/2" hole, opposite thread direction heims each end of the tie rod. Shame it's all got to be dismantled for powder coating.
One thing I should have done right at the outset: unpack the back of heim joints and inspect them. There are left- and right-handed ones, different shaft sizes and different thread sizes. It helps to pair the appropriate lock nut with each heim. Obviously - with hindsight - the heims for the tie rods have different thread directions at each end, since they form the toe-in adjustment for the spindle, but I didn't latch onto this for a while.
I took a bunch of notes from the videos and made sketches of what I though the correct assembly should be.
On my car, the channel that the A-arms fit into was just a fraction too small to accept a heim joint plus two cone spacers as directed in the video. I measured 1 5/32" on this top part; the required spacing was more like 1 3/8" to get everything packed in. Your mileage may vary.
In order to open up the gap a bit I used a bolt through one of the half inch holes with a nut either side of the channel, inside. This allowed me to open up the channel just enough to get everything installed.
Here's an upper A-arm joint assembled with two cone spacers and the heim joint inside the channel frame mount. I still had to use a drift to get that last cone space in place. It's tighter than a gnat's chuff in there (as the saying goes).
The rear lower A-arm mount point also gets the tie rod attached to it. 1/2" thread size heim, 1/2" hole, opposite thread direction heims each end of the tie rod. Shame it's all got to be dismantled for powder coating.
comled- Posts : 179
Join date : 2015-10-07
Location : New Hope, PA -
Re: Classic R #27 Build - Front and Rear Suspension Dry Fit
![]() by comled Wed Jan 27, 2016 12:48 pm
by comled Wed Jan 27, 2016 12:48 pm
Going back to the firewall shelf for a moment, I noticed when I tried to dry fit the brake booster that the firewall shelf interferes with it. The shelf needs a cut-out to accommodate the brake booster. I decided to make an aluminum tray that will provide a closed recess for the brake booster to sit in.
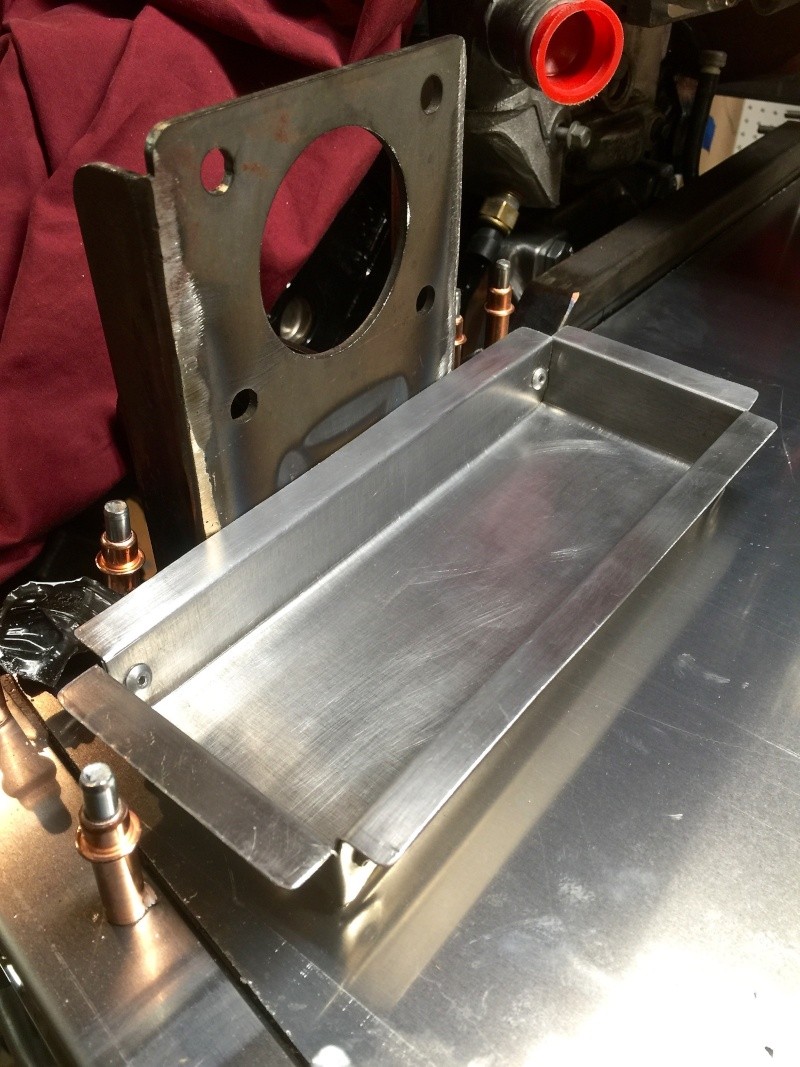
This is just folded up from a piece of aluminum sheet, with a pop rivet in each corner to hold the edges together. The recess is 8" long by 3" wide by 1" deep to accommodate the brake booster with room to spare. I allowed a 1/2" flange around the outside for mounting. I still have to notch the front edge of the tray to fit it around the brake booster bracket. If I ever make another one I'd cut the edge nearest the side of the frame so that it runs parallel with frame tube. Perhaps I'll do that with the battery bracket over on the far side.
This is just folded up from a piece of aluminum sheet, with a pop rivet in each corner to hold the edges together. The recess is 8" long by 3" wide by 1" deep to accommodate the brake booster with room to spare. I allowed a 1/2" flange around the outside for mounting. I still have to notch the front edge of the tray to fit it around the brake booster bracket. If I ever make another one I'd cut the edge nearest the side of the frame so that it runs parallel with frame tube. Perhaps I'll do that with the battery bracket over on the far side.
comled- Posts : 179
Join date : 2015-10-07
Location : New Hope, PA -
Re: Classic R #27 Build - Front and Rear Suspension Dry Fit
![]() by comled Thu Jan 28, 2016 7:48 am
by comled Thu Jan 28, 2016 7:48 am
Some more notes on the assembly of the rear suspension, specifically the rear spindles and hubs. The spindles have three mount points - top, bottom and tie rod. Again I had to make sketches off the build videos to try to get a mental image of the assembly sequence.
Here's the spindle top bolt loosely assembled, cone spacers either side of the A-arm heim joint as the video indicates.
This is the tie rod mounting assembly with spacer washers. I put my washers and tie rod arm below the spindle. I know some builders had to put them above the spindle but I did not have any clearance issues.
Completed hub and spindle assembly viewed from the outside. In order to zero toe-in/toe-out I had to adjust the tie rod almost to the limit of the heim joints and I am wondering now whether I used the right tie rod arm in the assembly. There's not much thread engaged between the heim joints and the tie rod itself. Also I'm missing the reverse thread lock end lock nut for the 1/2" dia heim joint - must order those.

My hubs were a loose fit in the spindle. You can see the gap around the outside of the round part of the hub where it passes through the spindle. I was surprised by this because everything I've read indicates that they almost have to be pressed in. I wasn't going to do that since my spindles aren't powder coated yet - this was just a trial fit to get a general picture of how things fit together - but they went in easily. The three bolts holes were located correctly but the hub wasn't a tight fit in the spindle opening. I got an email later that day from Scott indicating he thought I might have the wrong spindles. I will wait and see if the new ones are a tighter fit in the opening.
The speed sensors are held in with a socket screw and I think they can be removed and the opening blanked off. I am planning to use one of them to drive the speedometer but I'll probably use a front one to avoid excessive wiring run length.
Here's the spindle top bolt loosely assembled, cone spacers either side of the A-arm heim joint as the video indicates.
This is the tie rod mounting assembly with spacer washers. I put my washers and tie rod arm below the spindle. I know some builders had to put them above the spindle but I did not have any clearance issues.
Completed hub and spindle assembly viewed from the outside. In order to zero toe-in/toe-out I had to adjust the tie rod almost to the limit of the heim joints and I am wondering now whether I used the right tie rod arm in the assembly. There's not much thread engaged between the heim joints and the tie rod itself. Also I'm missing the reverse thread lock end lock nut for the 1/2" dia heim joint - must order those.
My hubs were a loose fit in the spindle. You can see the gap around the outside of the round part of the hub where it passes through the spindle. I was surprised by this because everything I've read indicates that they almost have to be pressed in. I wasn't going to do that since my spindles aren't powder coated yet - this was just a trial fit to get a general picture of how things fit together - but they went in easily. The three bolts holes were located correctly but the hub wasn't a tight fit in the spindle opening. I got an email later that day from Scott indicating he thought I might have the wrong spindles. I will wait and see if the new ones are a tighter fit in the opening.
The speed sensors are held in with a socket screw and I think they can be removed and the opening blanked off. I am planning to use one of them to drive the speedometer but I'll probably use a front one to avoid excessive wiring run length.
comled- Posts : 179
Join date : 2015-10-07
Location : New Hope, PA -
Re: Classic R #27 Build - Front and Rear Suspension Dry Fit
![]() by comled Thu Jan 28, 2016 4:34 pm
by comled Thu Jan 28, 2016 4:34 pm
Finishing up on the dry fit of the rear suspension, here are some photos from the rocker, pushrod and shock absorber installation.

A view of the rocker, dry fit. At this point none of the bushings have been pressed in. That will happen after the rockers are powder coated. The lower side of the rocker connects to a pushrod that runs down to the A-arm. The upper side of the rocker goes to the shock absorber. I was surprised at how skinny the bolt is that the rocker swings on - it's a 3/8" bolt.
The A-arm/pushrod joint - a heim, cone spacers and a bolt running down the middle.

The rear shock absorbers mount at the top. I oriented mine so that the adjuster is accessible from underneath the shock absorber. The other end hooks up to the rocker.

View of the completed suspension, spindle and hub assembly. The driveshafts are not installed yet.
A view of the rocker, dry fit. At this point none of the bushings have been pressed in. That will happen after the rockers are powder coated. The lower side of the rocker connects to a pushrod that runs down to the A-arm. The upper side of the rocker goes to the shock absorber. I was surprised at how skinny the bolt is that the rocker swings on - it's a 3/8" bolt.
The A-arm/pushrod joint - a heim, cone spacers and a bolt running down the middle.
The rear shock absorbers mount at the top. I oriented mine so that the adjuster is accessible from underneath the shock absorber. The other end hooks up to the rocker.
View of the completed suspension, spindle and hub assembly. The driveshafts are not installed yet.
comled- Posts : 179
Join date : 2015-10-07
Location : New Hope, PA -
Re: Classic R #27 Build - Front and Rear Suspension Dry Fit
![]() by comled Mon Feb 01, 2016 11:11 pm
by comled Mon Feb 01, 2016 11:11 pm
Spent most of the weekend powder coating the rear suspension parts. I decided to do it myself rather than send the parts out because considering overall the number of parts I want to deal with, I could buy a kit and do it myself.

My first efforts were with the tie rods and push rods. The results were OK - a bit thin on the knurled sections but fine on the solid surface of the rods. Since these rods are plated anyway I'm not that concerned. Encouraged by my efforts on these parts I went ahead and coated the rest of the parts. By the time I was finishing up the last A-arm I had the process dialled in nicely and I am very pleased with the results. Next weekend I will do the front suspension parts, plus the alternator bracket.

I powder coated the rear rockers then went back and pressed in the bushings, which are a two-part affair: the outer bushing gets pressed in, then a smaller diameter liner goes in through the center of it. I deburred the through-hole first with a needle file, then wiped the tubing with some anti-sieze compound before pressing in the two outer bushings in the vice. They are a very snug fit: getting everything lined up cleanly before cranking down on the vice is key.
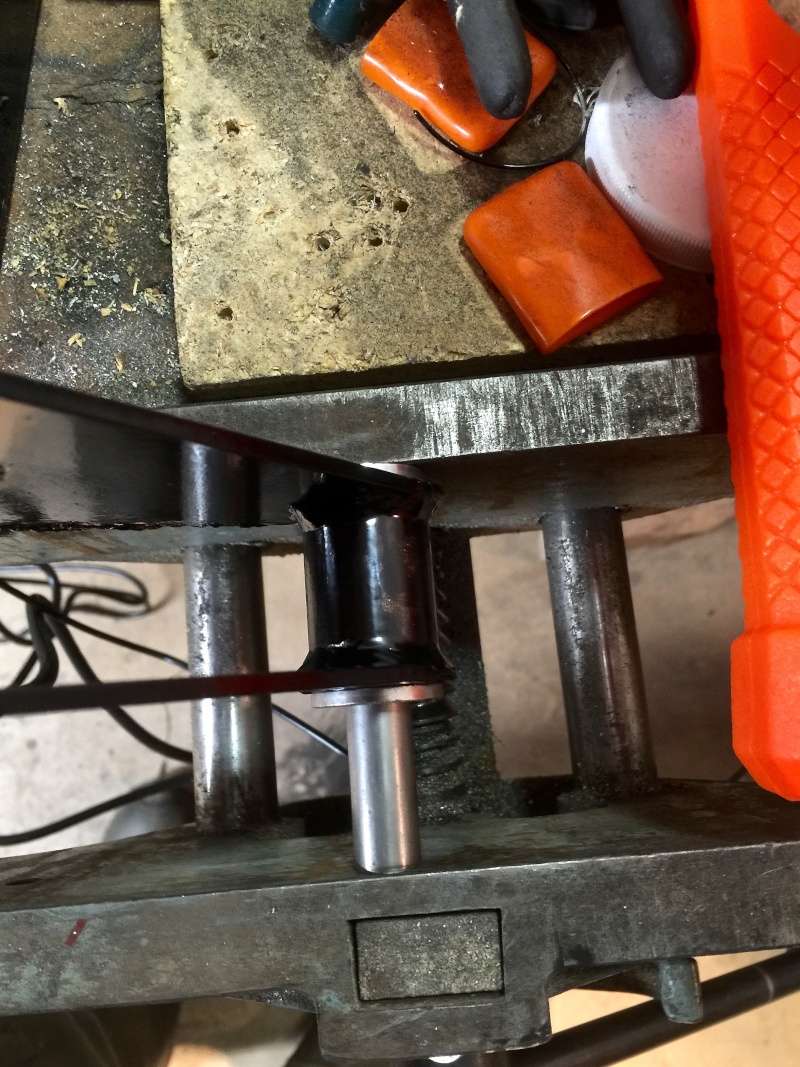
By contrast, the inner bushing is a relatively easy press fit down the middle using the vice.

The completed bushing set installed in the rocker.
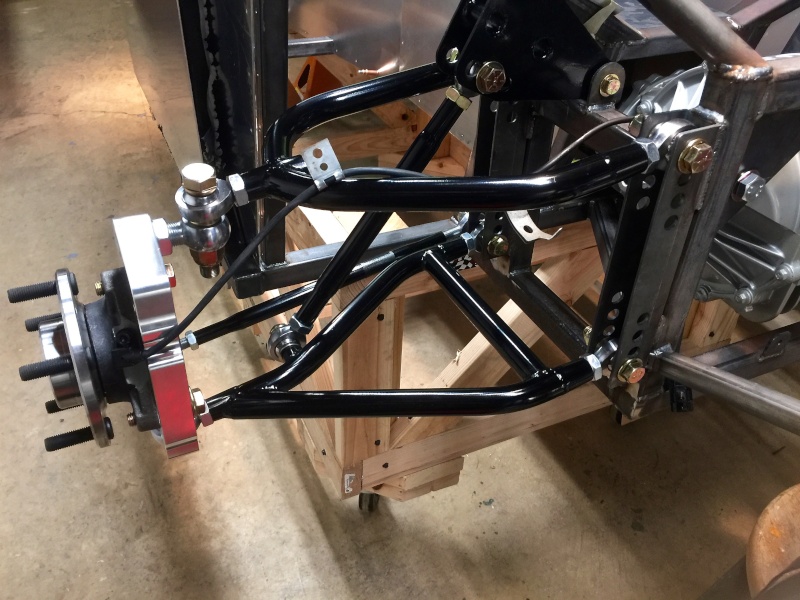
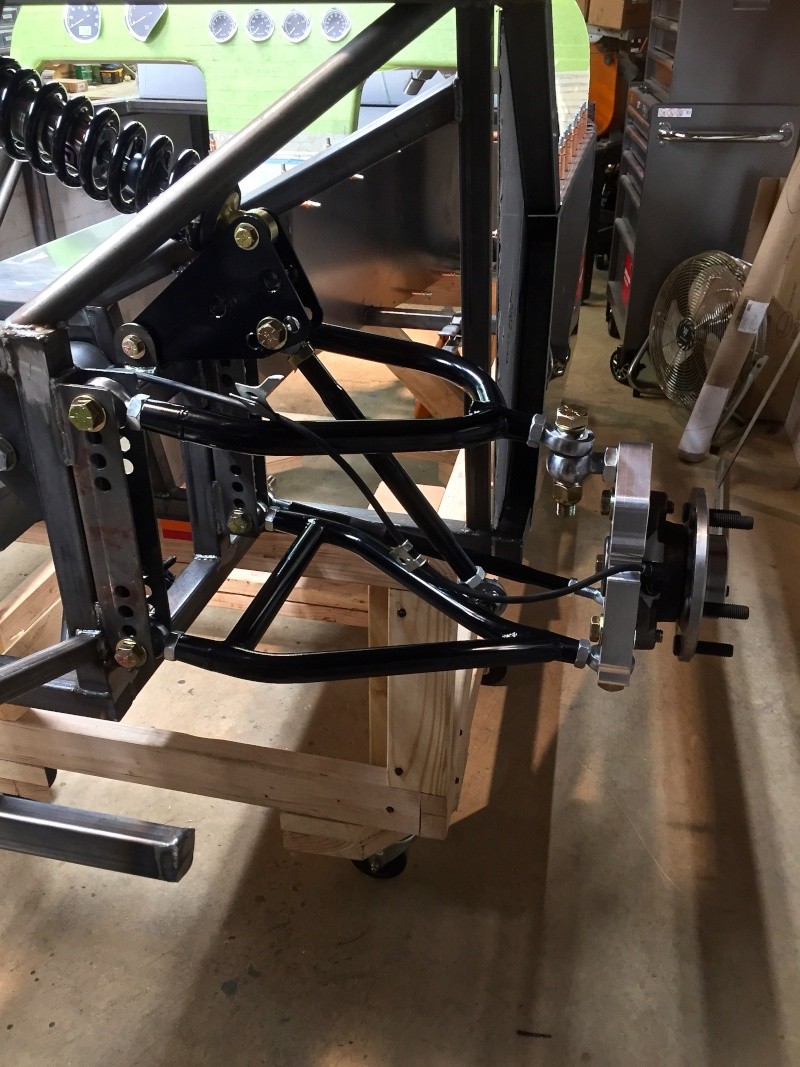
Some images of the complete powder coated rear suspension, left and right sides. The powder coating makes all the difference to the way it looks. For the record, I used Eastwood gloss black and their Deluxe Hotcoat gun (which is a single fixed-voltage gun).
Jumping forward to the front of the car for a moment, I test-mounted the alternator. The following pictures tell the story: the mount is a bit fiddly and it doesn't leave an enormous amount of clearance to the nearby frame tubes, but I was able to stuff everything in. The alternator is the 11319 92 Geo Prism unit specified in the purchasing list.
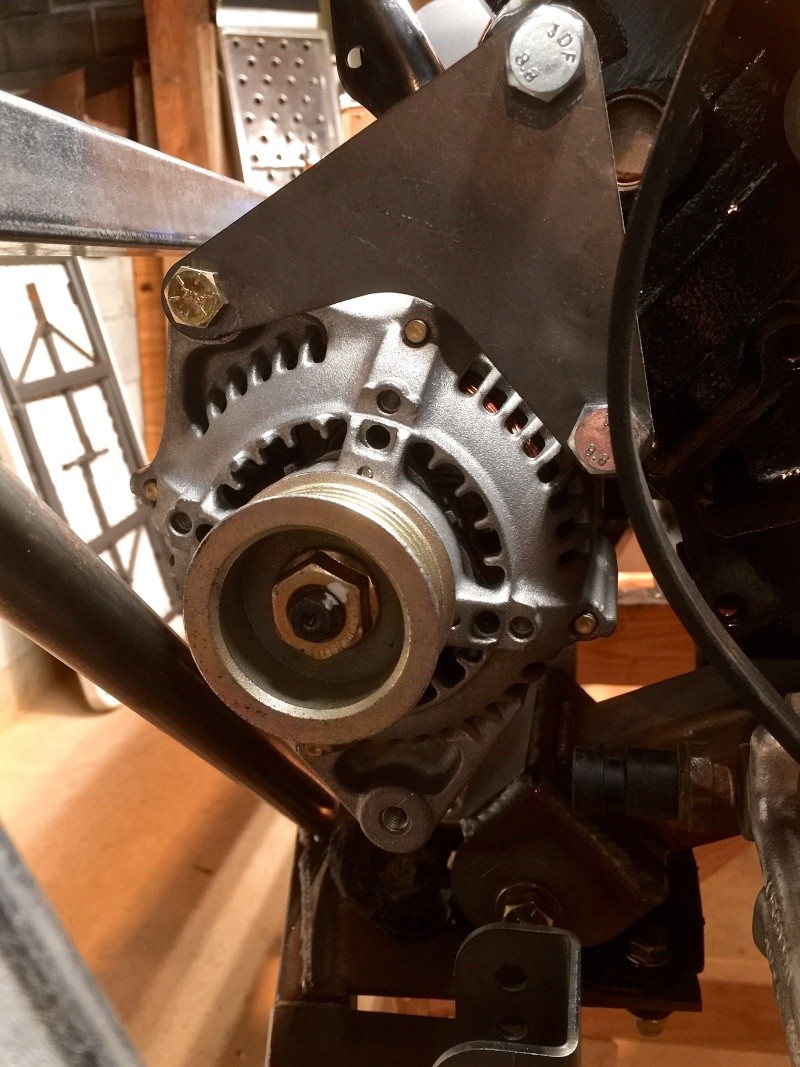


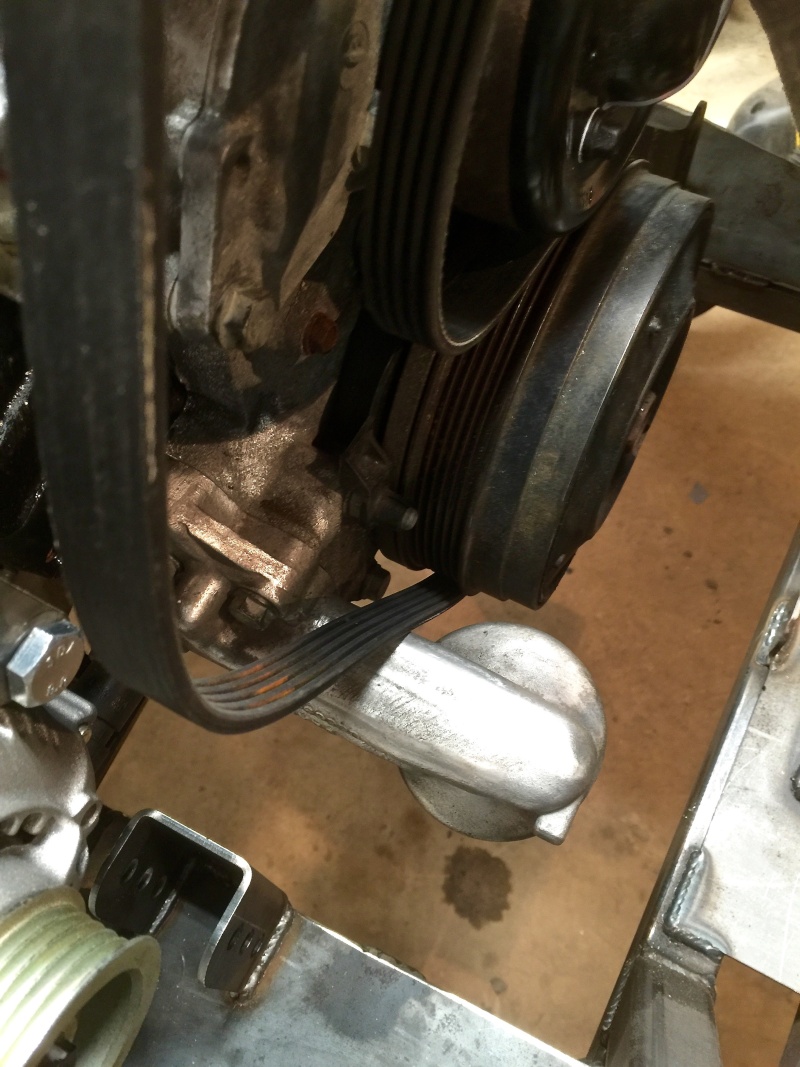
Having figured out the right orientation for the bracket and alternator, I realized that my oil filter housing interferes with the line of the belt. Off to ebay to look for alternatives...
My first efforts were with the tie rods and push rods. The results were OK - a bit thin on the knurled sections but fine on the solid surface of the rods. Since these rods are plated anyway I'm not that concerned. Encouraged by my efforts on these parts I went ahead and coated the rest of the parts. By the time I was finishing up the last A-arm I had the process dialled in nicely and I am very pleased with the results. Next weekend I will do the front suspension parts, plus the alternator bracket.
I powder coated the rear rockers then went back and pressed in the bushings, which are a two-part affair: the outer bushing gets pressed in, then a smaller diameter liner goes in through the center of it. I deburred the through-hole first with a needle file, then wiped the tubing with some anti-sieze compound before pressing in the two outer bushings in the vice. They are a very snug fit: getting everything lined up cleanly before cranking down on the vice is key.
By contrast, the inner bushing is a relatively easy press fit down the middle using the vice.
The completed bushing set installed in the rocker.
Some images of the complete powder coated rear suspension, left and right sides. The powder coating makes all the difference to the way it looks. For the record, I used Eastwood gloss black and their Deluxe Hotcoat gun (which is a single fixed-voltage gun).
Jumping forward to the front of the car for a moment, I test-mounted the alternator. The following pictures tell the story: the mount is a bit fiddly and it doesn't leave an enormous amount of clearance to the nearby frame tubes, but I was able to stuff everything in. The alternator is the 11319 92 Geo Prism unit specified in the purchasing list.
Having figured out the right orientation for the bracket and alternator, I realized that my oil filter housing interferes with the line of the belt. Off to ebay to look for alternatives...
comled- Posts : 179
Join date : 2015-10-07
Location : New Hope, PA -
Re: Classic R #27 Build - Front and Rear Suspension Dry Fit
![]() by comled Thu Feb 04, 2016 7:40 am
by comled Thu Feb 04, 2016 7:40 am
While I pursue my oil filter housing issues, here are a couple of images of the Coleman steering rack test fit. It's held in by three bolts - no surprises installing but check the lengths of the bolts before you fit as one's longer than the others. I did note that the grease nipples aren't accessible as is and they'll need to be adjusted for maintenance.

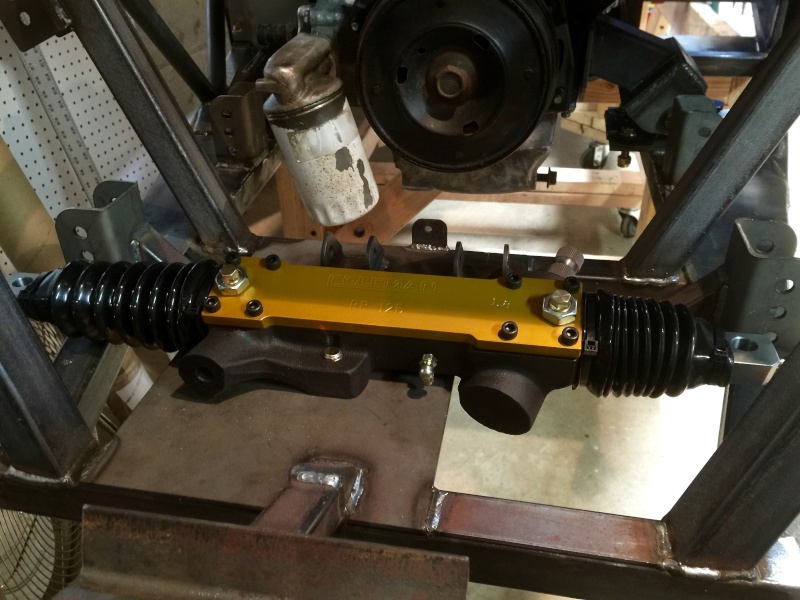
It's a neat steering rack - feels precise and there is no hint of play so far as I can tell, but that's without a shaft and steering wheel bolted on.
It's a neat steering rack - feels precise and there is no hint of play so far as I can tell, but that's without a shaft and steering wheel bolted on.
comled- Posts : 179
Join date : 2015-10-07
Location : New Hope, PA -
Re: Classic R #27 Build - Front and Rear Suspension Dry Fit
![]() by comled Sun Feb 07, 2016 8:32 am
by comled Sun Feb 07, 2016 8:32 am
Yesterday I got back to test assembling the front suspension and steering. I ran into one issue which I'll document later. Otherwise there were no surprises.
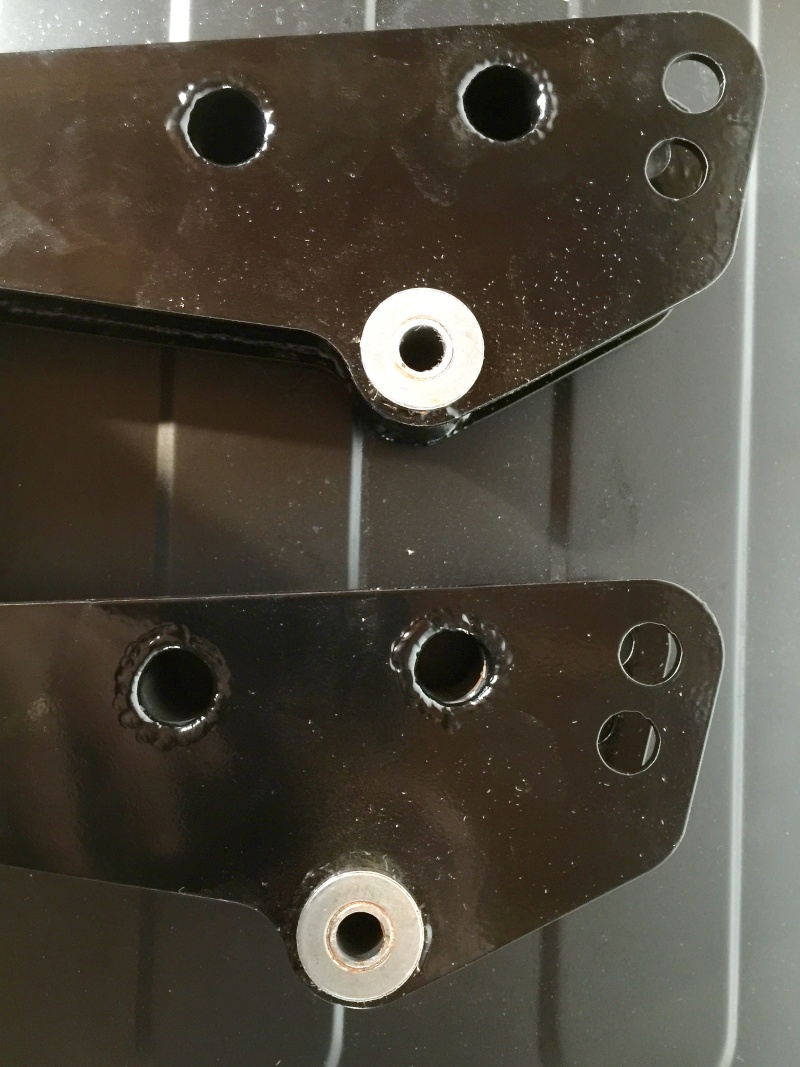
As with the rear, I powder coated the rocker arms before pressing in the bushings. They were the same snug fit as with the rear ones but a smear of anti-seize compound on the inside surface of the rocker helps and again, I pressed them in using the bench vice. It helps to get one side started first, then open up the vice, line the other one up and have at it. By the way, that's just dust on the rocker arm, not defects in the powder coat finish. I really like how this powder coat process is working out. The parts are coming out well.

Here are the rockers and the shock absorbers assembled in place. To get the driver's side lower shock bolt in is a squeeze because the rack spline joint gets in the way but with some care you can get it through without marring either the bolt or the shaft - and without removing the rack.
I finished up the day by powder coating the pushrods and steering tie rods and they'll get assembled onto the car today while I coat the A-arms.
A week or so back I ordered some 3003 .040" aluminum sheet for the computer tray and the dash. That arrived this week somewhat bent but it will straighten out enough to be usable. Once I get done with the suspension I'll revisit the dash. I also got a shipping confirmation from Speedhut, so my gauges are on the way.
I made a decision on the oil filter housing. The part number most likely to do the job is GM 24500345 and it's used in some but not all Pontiacs and Buicks from the late 90s. But it's a discontinued part and seems to be as rare as hen's teeth. I got a lead on a used one via car-part.com that ultimately didn't work out. So I bit the bullet on the Intense Racing oil relocation adapter. It's a bit pricey at $164 but I don't have a lot of salvage yards in my area to troll around looking for a suitable oil filter housing, and it will have the advantage that I can perhaps put the oil filter in a spot where I can get to it from above. Frankly it will look nice as well. I'm pairing it with a Trans-Dapt 1028 (Summit P/N TRD-1028)oil filter relocation bracket and will make up the necessary braided hoses to hook it up.

Photo credit: intense-racing.com
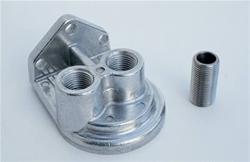
Photo credit: summitracing.com
As with the rear, I powder coated the rocker arms before pressing in the bushings. They were the same snug fit as with the rear ones but a smear of anti-seize compound on the inside surface of the rocker helps and again, I pressed them in using the bench vice. It helps to get one side started first, then open up the vice, line the other one up and have at it. By the way, that's just dust on the rocker arm, not defects in the powder coat finish. I really like how this powder coat process is working out. The parts are coming out well.
Here are the rockers and the shock absorbers assembled in place. To get the driver's side lower shock bolt in is a squeeze because the rack spline joint gets in the way but with some care you can get it through without marring either the bolt or the shaft - and without removing the rack.
I finished up the day by powder coating the pushrods and steering tie rods and they'll get assembled onto the car today while I coat the A-arms.
A week or so back I ordered some 3003 .040" aluminum sheet for the computer tray and the dash. That arrived this week somewhat bent but it will straighten out enough to be usable. Once I get done with the suspension I'll revisit the dash. I also got a shipping confirmation from Speedhut, so my gauges are on the way.
I made a decision on the oil filter housing. The part number most likely to do the job is GM 24500345 and it's used in some but not all Pontiacs and Buicks from the late 90s. But it's a discontinued part and seems to be as rare as hen's teeth. I got a lead on a used one via car-part.com that ultimately didn't work out. So I bit the bullet on the Intense Racing oil relocation adapter. It's a bit pricey at $164 but I don't have a lot of salvage yards in my area to troll around looking for a suitable oil filter housing, and it will have the advantage that I can perhaps put the oil filter in a spot where I can get to it from above. Frankly it will look nice as well. I'm pairing it with a Trans-Dapt 1028 (Summit P/N TRD-1028)oil filter relocation bracket and will make up the necessary braided hoses to hook it up.
Photo credit: intense-racing.com
Photo credit: summitracing.com
comled- Posts : 179
Join date : 2015-10-07
Location : New Hope, PA -
Re: Classic R #27 Build - Front and Rear Suspension Dry Fit
![]() by Brian Degulis Sun Feb 07, 2016 9:25 am
by Brian Degulis Sun Feb 07, 2016 9:25 am
Wow your workmanship and attention to detail is impressive. Taking the time to document photograph and post the step by step procedure is going to be a big help to anyone building a car. When your done Scott should consider putting this thread in a permanent folder for furure refrence.
Brian
Brian
Brian Degulis- Posts : 22
Join date : 2015-06-10
Re: Classic R #27 Build - Front and Rear Suspension Dry Fit
![]() by comled Sun Feb 07, 2016 4:45 pm
by comled Sun Feb 07, 2016 4:45 pm
Thanks Brian. I'm trying to capture what I'm doing as I go along in the hope that it will be useful to someone else later. For most Stalker builders this is probably too much information but as I'm a beginner at building (vs rebuilding) cars I'm figuring out a lot as I go along. Even basic stuff like trying to jam those bushings into the rockers - someone who's never done it could spend a long time and a lot of bruised fingers and thumbs finding a workable approach.
Information on the V6 builds is definitely scarce even though a lot of it overlaps with the V8 builds. Just trying to fill in the gaps!
-Dave
Information on the V6 builds is definitely scarce even though a lot of it overlaps with the V8 builds. Just trying to fill in the gaps!
-Dave
comled- Posts : 179
Join date : 2015-10-07
Location : New Hope, PA -
Classic R #27 Build - Front and Rear Suspension Dry Fit
![]() by comled Mon Feb 08, 2016 10:23 pm
by comled Mon Feb 08, 2016 10:23 pm
Sunday was another full-on day of suspension and powder coating. I completed powder coating the A-arms and tie rods and got them assembled with the spindles.

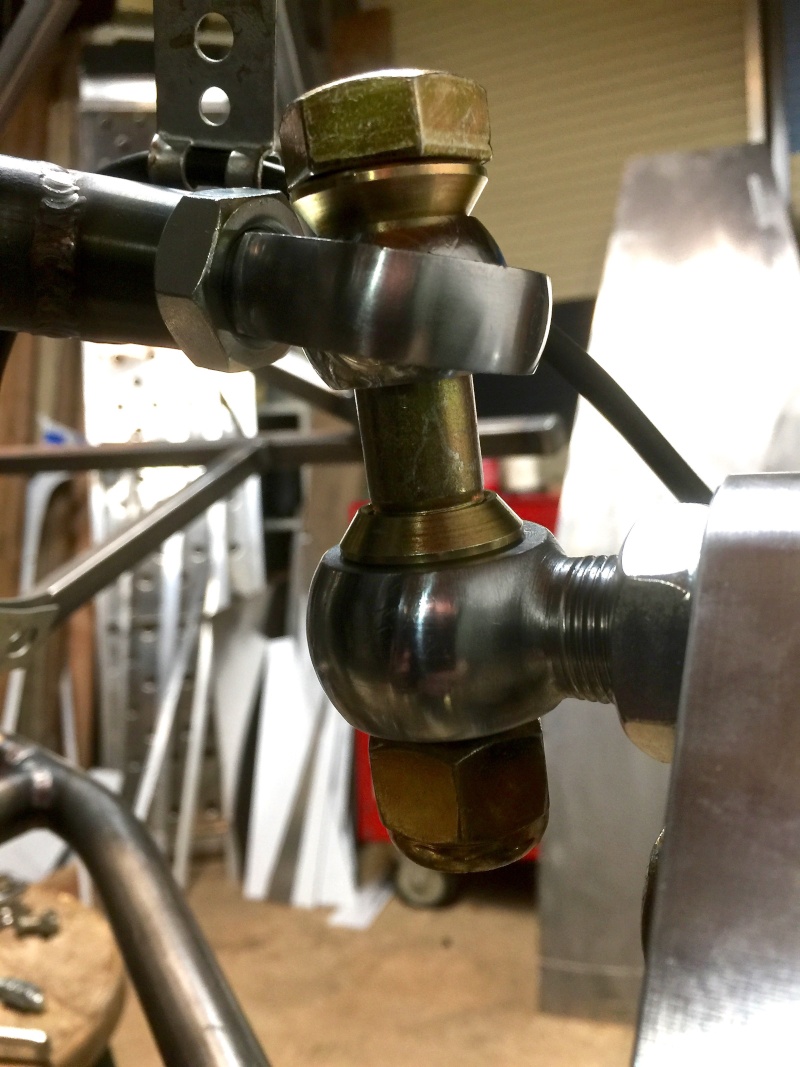
Here's the passenger side setup. That lock nut on the rod end is going to be critical in keeping the spindle in the right place. The nut is 1 1/8" if I recall correctly so that's an important wrench size to have on hand.
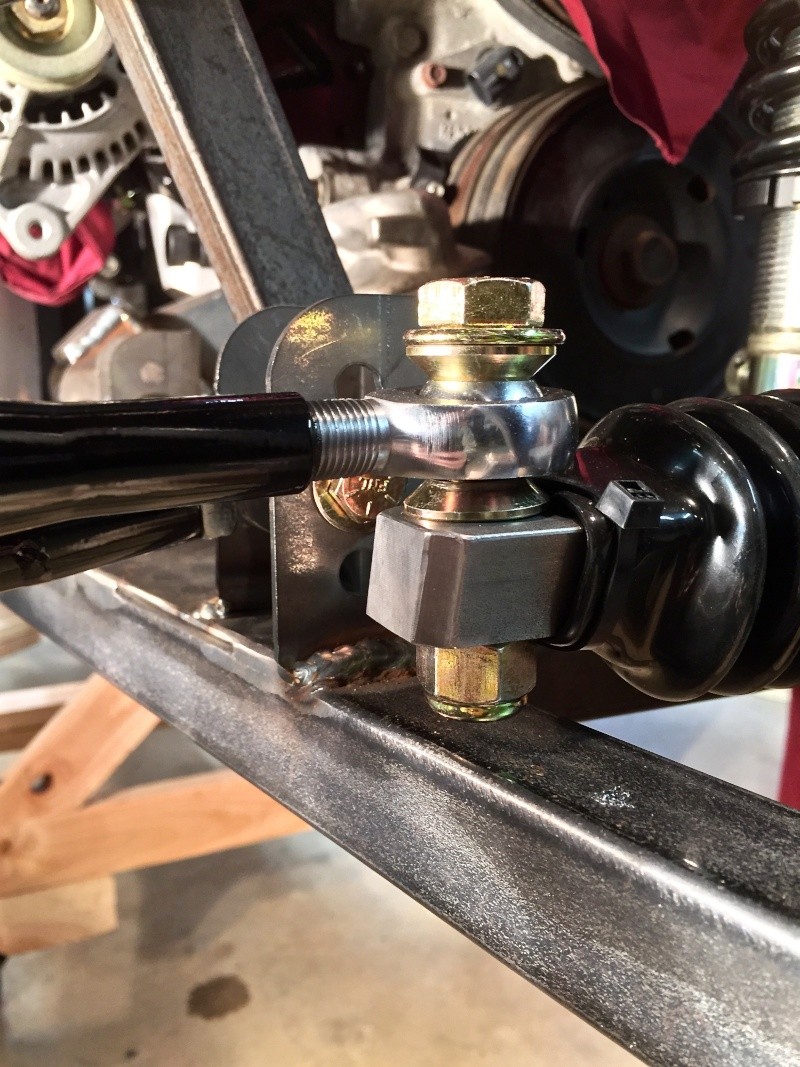
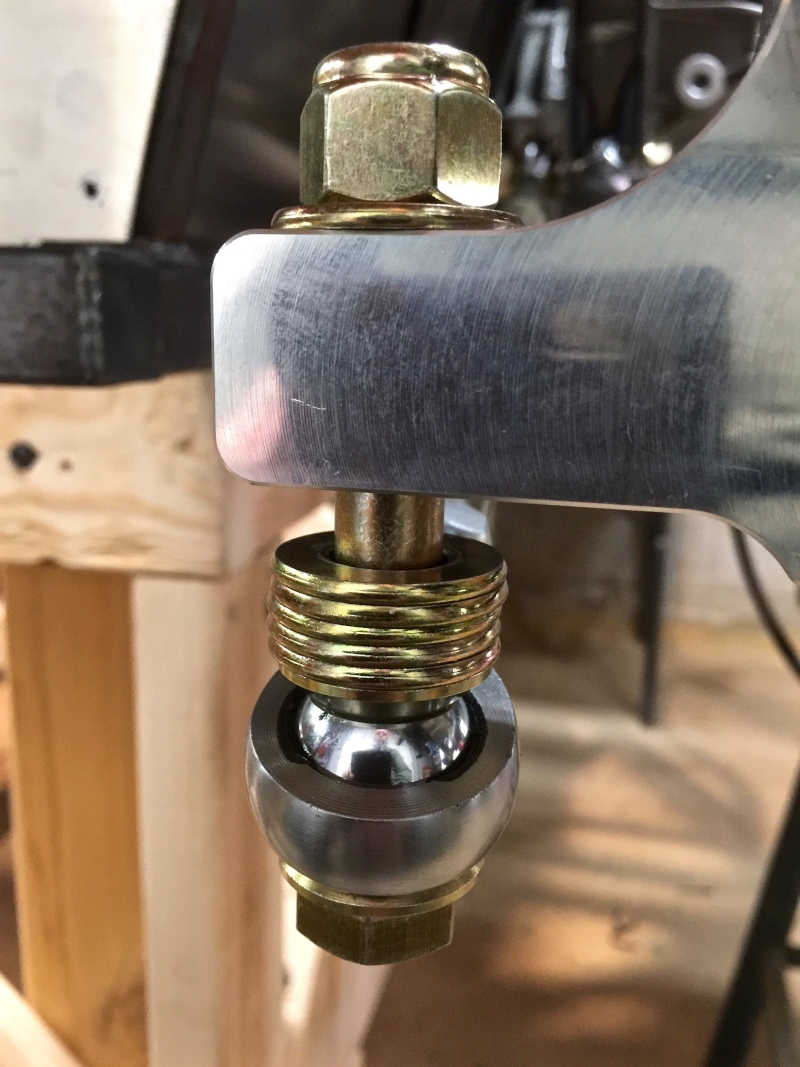
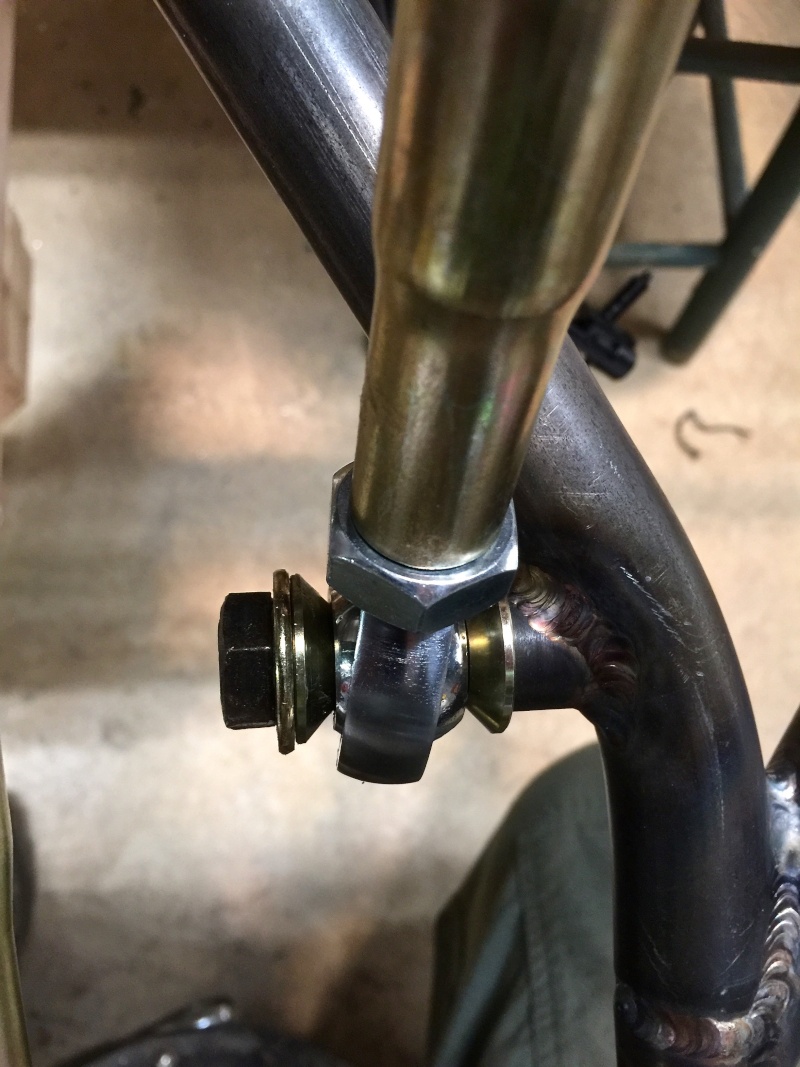
Closeup of the steering rack to tie rod attachment. There's just enough clearance for the bolt to pass over the frame so it doesn't jam the steering. I may add another washer above the top cone spacer to give me an extra margin of clearance to the frame. I'm still missing my 1/2" left hand thread jam nuts - on the way from Summit Racing along with the oil filter relocation parts I ordered.

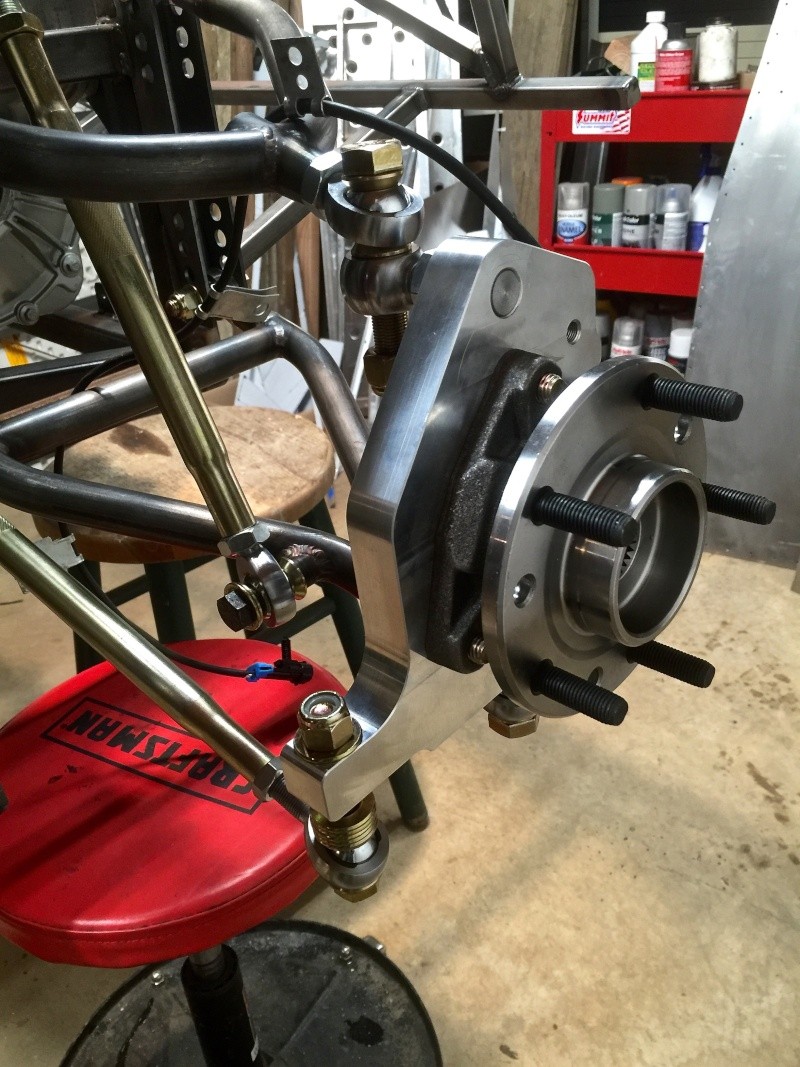
Overview of the assembled steering and front suspension. I still have a couple of clearance issues to resolve on the lower A-arm where the push rod attaches. I could not get the heim joint plus two cone washers to fit inside the bracket on the A-arm on one side. One side fine, the other not. Both A-arm channels measured the same. After scratching my head for a while I figured the heim joints were in fact different diameters on the ball joint. I ordered another one from Speedway Motors - let's see if it helps.
I stopped at this point because the next step is to fit the hubs, and they're a press fit into the spindles on the front. Next weekend I want to finish up powder coating the spindles front and rear, then I'll get the hubs installed and perhaps the calipers too.
-Dave
Here's the passenger side setup. That lock nut on the rod end is going to be critical in keeping the spindle in the right place. The nut is 1 1/8" if I recall correctly so that's an important wrench size to have on hand.
Closeup of the steering rack to tie rod attachment. There's just enough clearance for the bolt to pass over the frame so it doesn't jam the steering. I may add another washer above the top cone spacer to give me an extra margin of clearance to the frame. I'm still missing my 1/2" left hand thread jam nuts - on the way from Summit Racing along with the oil filter relocation parts I ordered.
Overview of the assembled steering and front suspension. I still have a couple of clearance issues to resolve on the lower A-arm where the push rod attaches. I could not get the heim joint plus two cone washers to fit inside the bracket on the A-arm on one side. One side fine, the other not. Both A-arm channels measured the same. After scratching my head for a while I figured the heim joints were in fact different diameters on the ball joint. I ordered another one from Speedway Motors - let's see if it helps.
I stopped at this point because the next step is to fit the hubs, and they're a press fit into the spindles on the front. Next weekend I want to finish up powder coating the spindles front and rear, then I'll get the hubs installed and perhaps the calipers too.
-Dave
comled- Posts : 179
Join date : 2015-10-07
Location : New Hope, PA -
» Classic R #27 Build
» Classic R #27 Build - Hubs, Calipers, Flexible Brake Hoses
» Classic R #27 Build - Lighting
» Classic R #27 Build - Frame
» Classic R #27 Build - Windshield
» Classic R #27 Build - Hubs, Calipers, Flexible Brake Hoses
» Classic R #27 Build - Lighting
» Classic R #27 Build - Frame
» Classic R #27 Build - Windshield
Page 1 of 1
Permissions in this forum:
You cannot reply to topics in this forum|
|
|